The Concept
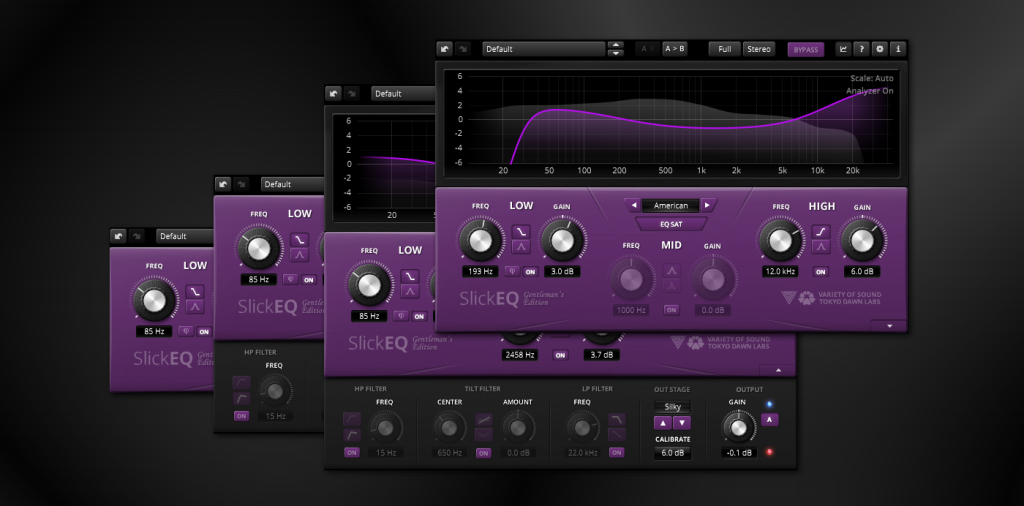
TDR VOS SlickEQ – Gentleman’s Edition is a mixing/mastering equalizer designed for ease of use, musical flexibility and impeccable sound. It combines the three semi-parametric filter-bands known from the standard editions with an exotic “Tilt”-filter flanked by lowpass and highpass filters. Five distinct EQ models provide a rich set of pre-defined EQ curves and behaviors for the three main filter bands.
In order to “warm up” the material with additional harmonic content, SlickEQ GE offers a switchable EQ non-linearity as well as an output stage with various output stages. These options are meant to offer subtle and interesting textures, rather than obvious distortion, the typical “mojo” often associated with high quality analogue audio gear.
An elaborate auto gain option automatically compensates for changes in perceived-loudness while operating the EQ. The 64bit multi-rate processing scheme (a.k.a. “internal resampling”) practically eliminates typical problems of digital EQ implementations such as frequency-warping, quantization distortion and aliasing.
Beside the primary controls, the plug-in comes with an array of additional helpers: Advanced preset management, frequency magnitude plots, undo/redo, quick A/B comparison, copy & paste, an online help, editable labels, mouse-wheel support and much more. Finally, SlickEQ GE allows to exclusively process the stereo sum or stereo difference without additional sum/difference encoding (see “M/S” microphony).
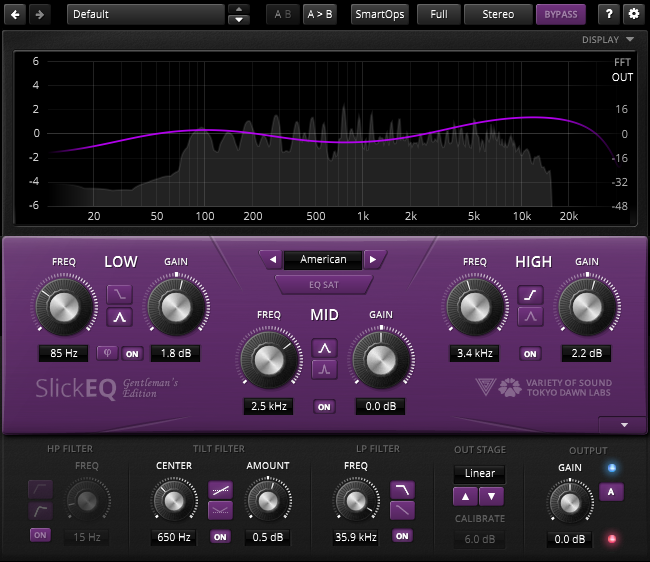
Main Controls
EQ Model
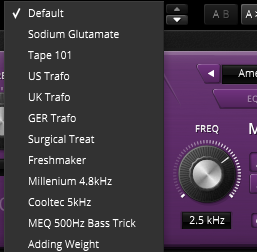
One of five different EQ models can be selected via the central drop down menu or cycled through with the help of previous/next buttons. The interface’s background color changes depending on the selected model.
The models represent a specific set of curves and EQ behaviors each providing their own musical “feel”. The different names and colors have no deeper meaning, they are meant to help with memorization and identification of the different models. The EQ model affects all filters with a colored background only (i.e. LP/HP/Tilt is not affected).
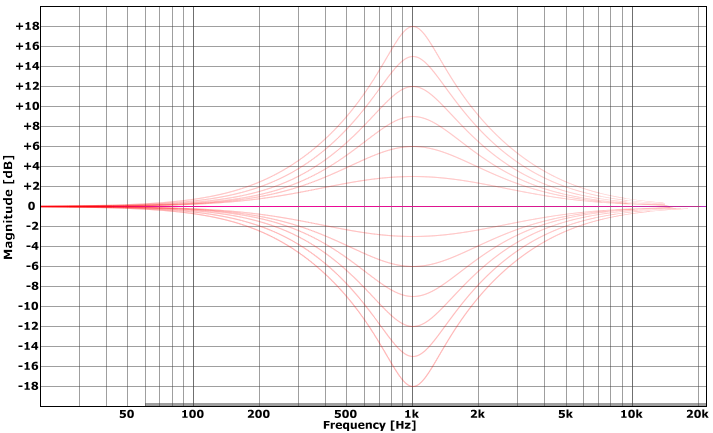
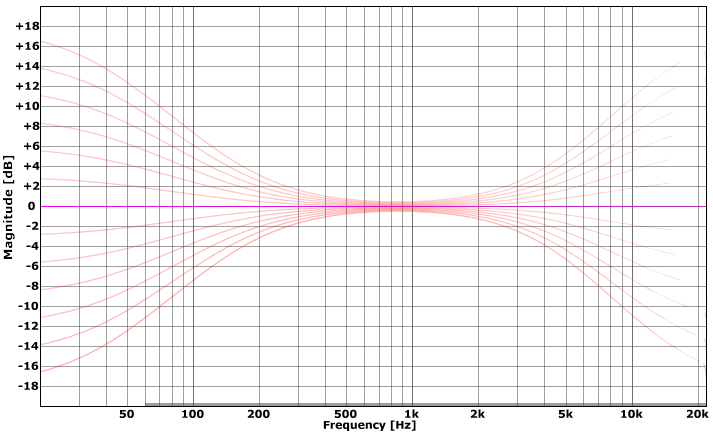
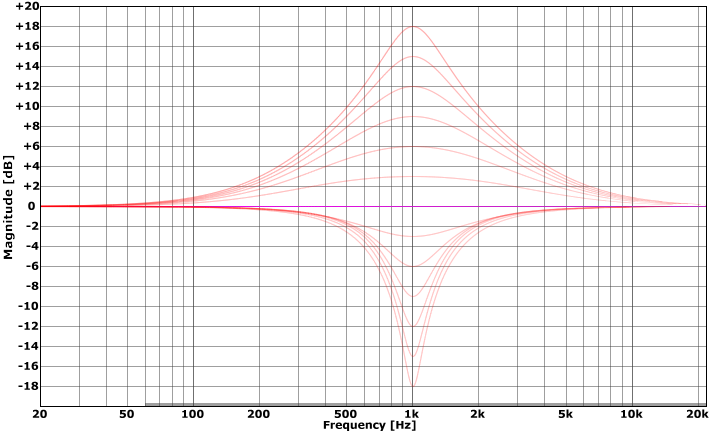
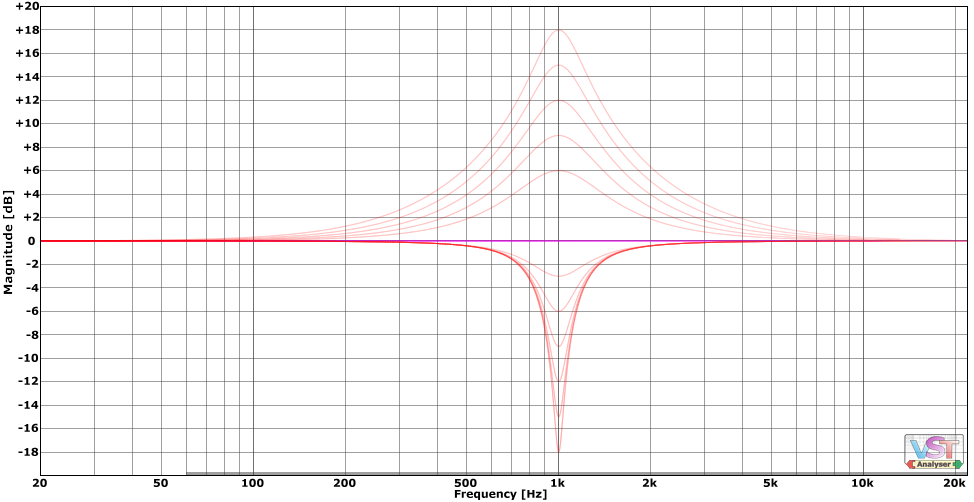
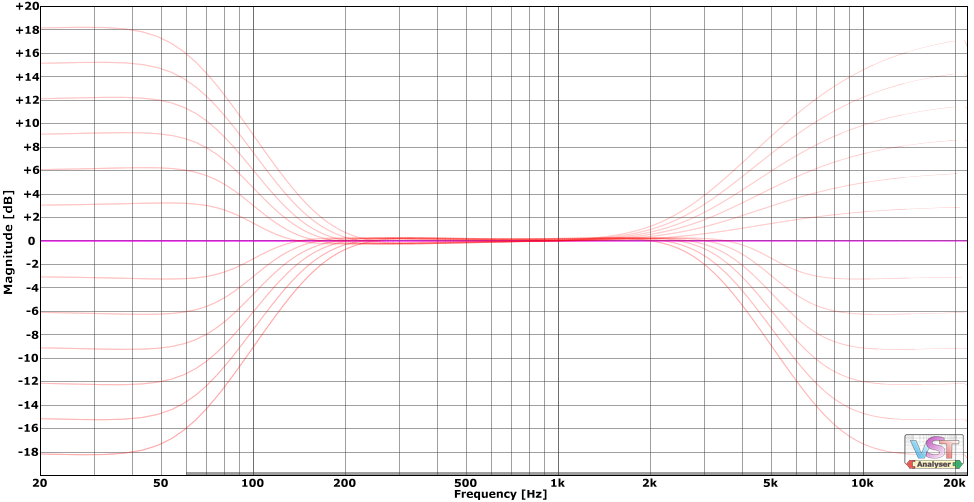
Model: American
| Classy and gentle slopes, American style. This is a traditional proportional Q design without surprises. A reliable all-rounder, a good choice for mastering applications. |
American model: Bell filter cut/boost range
American model: Shelving filter(s) cut/boost range
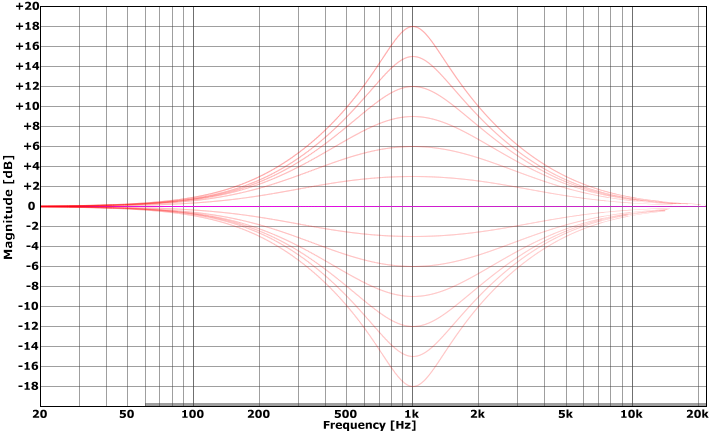
Model: British
| The British model’s distinct features are the bell filter’s asymmetric cut/boost shape and the subtle “dip” in the shelving filters. Note that the latter only appears during boost operation. This model is a well suited to creative tasks, Mixing in particular. |
British model: Bell filter cut/boost range
British model: Shelving filter(s) cut/boost range

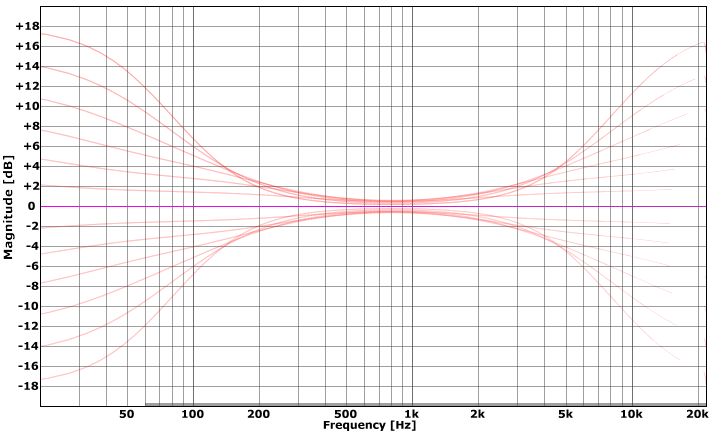
Model: German
| The German model offers special “tilt” shelving filters with large linear transitions (at low amounts of boost/cut). Well suited for broad spectral balancing or smooth shaping during mastering tasks. This also mode also produces the lowest amount of phase distortion (compared to other options). |
German model: Bell filter cut/boost range
German model: Shelving filter(s) cut/boost range
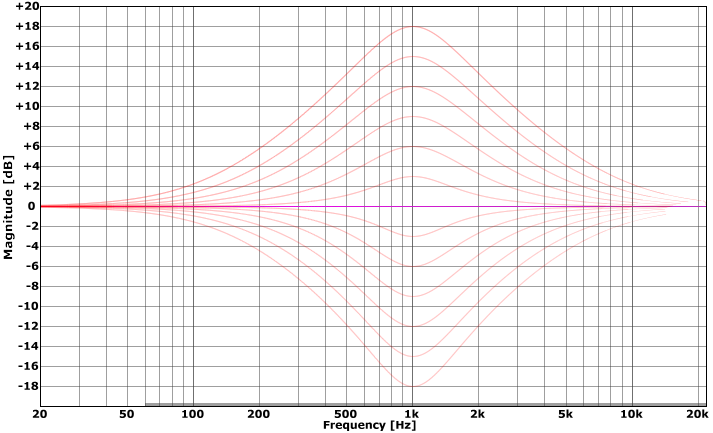
Model: Soviet
| The Soviet model features unique inverse proportional curves. That means, small boosts/cuts respond with very steep shapes, while larger values are producing increasingly wider curves. This exotic behavior makes it a per-fect candidate for creative purposes, and it is surprisingly useful during mixing. |
Soviet model: Bell filter cut/boost range
Soviet model: Shelving filter(s) cut/boost range

Model: Japanese
| The Japanese model features SlickEQ GE’s sharpest blades. This model is specifically fine-tuned for surgical control over the frequency spectrum. Note the asymmetric filter behavior of both bell and shelf modes. |
Japanese model: Bell filter cut/boost range
Japanese model: Shelving filter(s) cut/boost range
EQ Saturation
| Pressing EQ SAT activates a smooth non-linearity inside the filter network. This generates “musical” amounts of harmonic distortion, which purely affect EQ boosts. In other words, no EQ boost = no saturation. |
Low Frequency Band
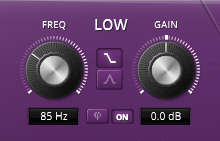 | Frequency controls the both center frequency of the selected filter-shape as well as the optional phase-shift (see ‘Phi’ below). Gain controls the amount of boost or reduction applied to the selected frequency region. Shape buttons control the filter shape. The low band section features both low-shelving and bell shapes. Pressing ON enables/disables the filter. |
The button labeled ![]() (Phi, lowercase) represents phase shift and deserves special attention. It activates a special filter network meant to distort the phase in a musically useful manner. It does not affect the frequency magnitude (all-pass). However, the network delays low frequencies relative to higher frequencies. In other words, low frequencies lag behind.
(Phi, lowercase) represents phase shift and deserves special attention. It activates a special filter network meant to distort the phase in a musically useful manner. It does not affect the frequency magnitude (all-pass). However, the network delays low frequencies relative to higher frequencies. In other words, low frequencies lag behind.
This seemingly boring filter covers a surprising range of uses such as waveform symmetrization; attack softening and subtle bass sustain extension; correction of phase issues in the mix and creative doubling/layering trickery. Last but not least, it can even correct certain forms of “dullness” and offers a useful alternative “color” to the low band section. This function is best discovered by ear.
Note: ![]() can be tuned with Frequency, butdoes not depend on Gain (!).
can be tuned with Frequency, butdoes not depend on Gain (!).
Mid Frequency Band
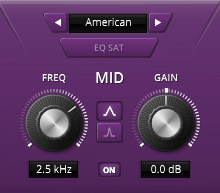 | Frequency controls the center frequency of the bell. Gain controls the amount of boost or reduction. Shape buttons give access to two different bell shapes, wide and narrow (notch). Pressing ON enables/disables the filter. |
High Frequency Band
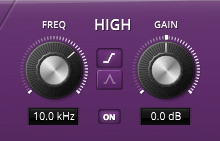 | Frequency controls the center frequency of the selected filter-shape. Note that SlickEQ GE’s filters offer a wide range up to 40 kHz. Gain controls the amount of boost or reduction applied to the selected frequency region. Shape buttons control the filter shape. The high band section features both high-shelving and bell shapes. Pressing ON enables/disables the filter. |
Note: The exact shapes of all three bands depend on the selected EQ Model, as well as on the selected corner frequency and gain.
High Pass Filter
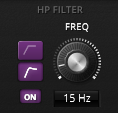 | The high-pass filter section features the classic 18db/Octave Butterworth filter known from SlickEQ standard edition. The second mode is a 12dB/Octave filter with a subtle “bump” common to magnetic-tape playback. Pressing ON enables/disables the filter. An interesting detail: the high-pass filter does its work after the main EQ section. That means, if “EQ Saturation” is turned on and a low-frequency boost is used, generated harmonics will follow the original signal and thus help the listener to psychoacoustically re-construct some of the content later removed by the hi-pass filter. |
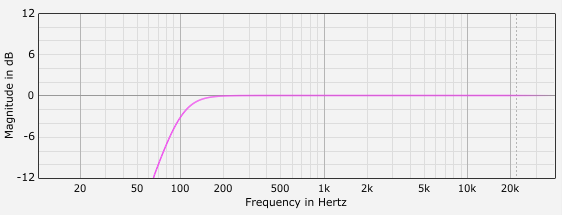
High-pass, standard mode (18dB/Octave)
High-pass, bump mode (12dB/Octave)

Note: The “bump” is centered one octave above the specified cutoff frequency. In this specific example, you can see that the high-pass filter’s -3dB point is set to 100Hz. The bump itself is centered at 200Hz.
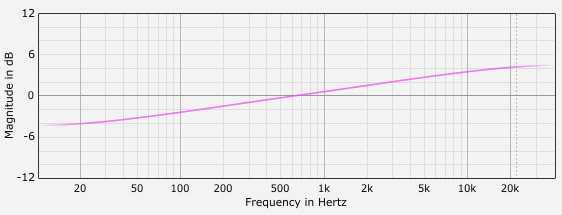
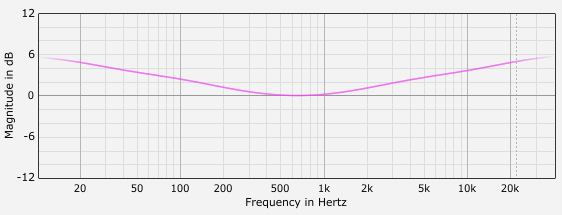
Tilt Filter
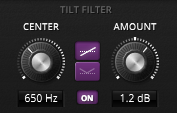 | Tilt filter allows shifting the full frequency spectrum in an almost linear manner. The section also features an interesting derivate of the traditional tilt-filter, the so-called “V” filter. The latter can work as crude “loudness” filter. Center controls the filter’s center frequency. Note that a seemingly strange behavior appears as soon one tries to control the center frequency of the “/” mode in conjunction with auto-gain: The center frequency won’t change! This is perfectly normal, because auto-gain compensates the loudness change. Amount controls the strength of the effect in dB per decade. Pressing ON enables/disables the filter. |
“/” shape, amount 3dB
“V” shape, amount 3dB
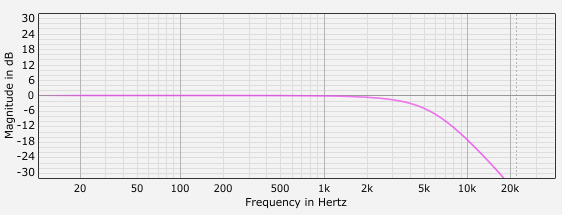
Low Pass Filter
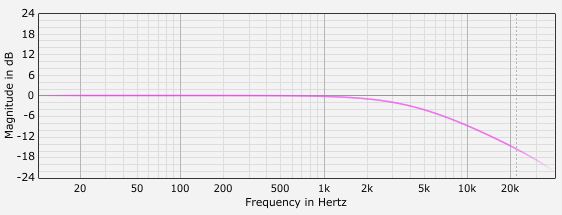
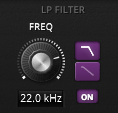 | Low-pass filter section allows to smoothly control the high frequency region. The shape buttons offers access to a 12db/Octave filter or a smooth 6dB/Octave filter. Clicking the ON button enables/disables the section. |
4kHz low-pass, steep mode (12dB/Octave)
4kHz low-pass, smooth mode (6dB/Octave)
Output Stage
 | The output stage section offers access to six different output stages. Each option is meant to provide a more or less subtle sound texture. They do not saturate in the traditional sense. Calibrate allows to adjust the output stage model “drive” in decibel. It gives control over the amount of generated harmonic content without the need for clumsy input/output drive techniques. |
- Linear: As clean as it gets, absolutely linear.
- Silky: Dynamic saturation with an “open” character. Generates low order, even and odd harmonics (average case).
- Mellow: Subtle warming. Generates a very low level odd order harmonics series with a dominant 3rd partial (average case).
- Deep: Dynamic odd order distortion with a distinct frequency dependent touch for increased depth and dimension.
- Excited: Exciter style saturation, enhances the perceived bandwidth.
- Toasted: Crudely approximates the behavior of in/out transformers.
- Funky: Input transformer behavior including magnetic hysteresis.
- Seven: A transient specific saturator.
Output Gain and Auto Gain
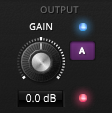 | Ouput gain adjusts the output gain in decibel. A red overload-hold LED activates whenever the output signal exceeds 0dBfs, and remains active until re-set. The max-peak history is automatically reset as soon an as audio parameter changes. A left-click on the LED forces a re-set manually. The A (auto) button activates the auto-gain compensation. This mode tries to preserve the subjective loudness during EQ while operating the EQ. This mode gives a much better idea of what the EQ is really doing to the material, because it strongly reduces perception issues related to gain differences. In other words, boosts don’t automically give the impression to sound better and cuts tend to sound far less “boring” than they seem without auto-gain (or careful manual loudness matching). A blue LED indicates auto-gain activity. |
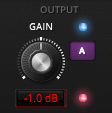 | Holding the mouse-cursor over the overload LED enables a secondary output gain trim mode which shows the difference between 0dBfs and the current max peak history value. A left click on the trim display sets the output gain as indicated (which practically “normalizes” the plugin’s output gain). Any click outside the region disables the trim mode again. |
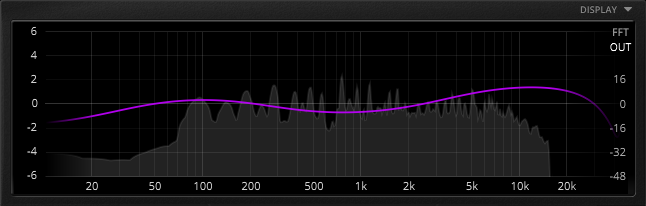
Frequency Magnitude Display
Clicking the “DISPLAY” button to right of the display opens/closes the frequency magnitude display. This view primarily shows SlickEQ GE’s overall filter magnitude response. A spectrum analyzer can additional be activated, showing the spectrum at input or output. Clicking the left ruler allow to adapt the main EQ magnitude’s indicated range.
Toolbar
Undo/Redo
| Use the undo/redo buttons to navigate previous control states. The exact event is shown in a tool-tip. Note that certain controls are not tracked by this function (e.g. “Bypass”). |
Preset Management
 | The preset drop-down list gives quick access to factory and user presets. Alternatively, up/down buttons allow to cycles through them with a single click. |
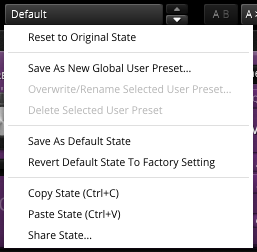 | Advanced preset management options can be accessed from the context menu (right-click):: Reset to Original state re-sets the preset to its original state. Save As New Global User-Preset opens a dialog used to create User Presets. These presets persist across sessions and DAWs (presets are saved on your machine). Similarly, you can also overwrite or rename presets by selecting “Overwrite/rename Selected User-Preset”. Save As Default State replaces the plugins default preset with the current parameter state. See section“Context Menu”below for details about the Copy/Paste/Share State options. |
A/B Control
| A/B allows to quickly compare two alternative control settings. A>B or B<A copies one state to the other. |
Smart Ops
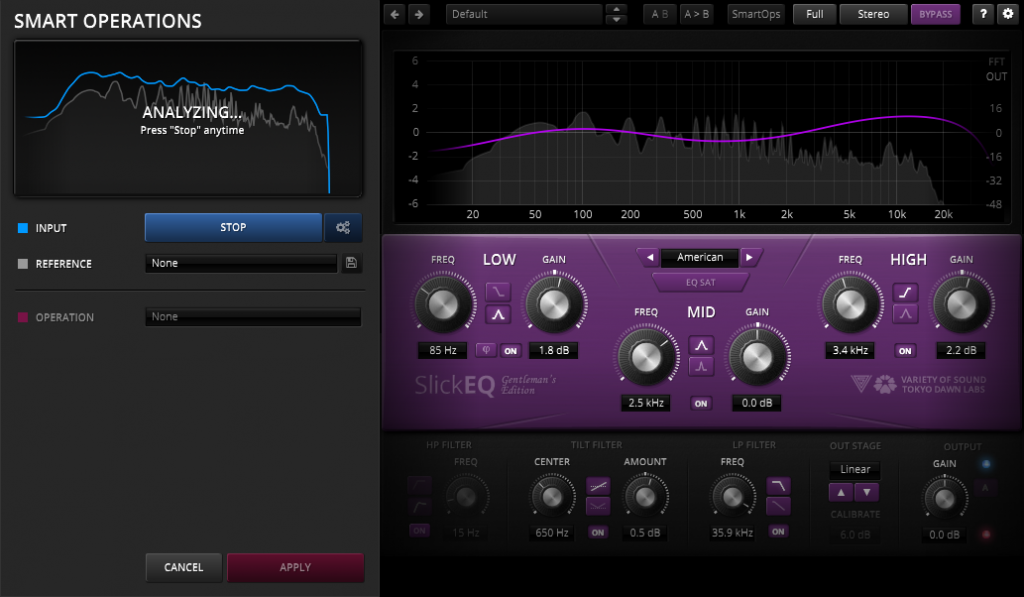
Smart Operations analyze the audio input’s spectral properties and allow running Operations in dependence of this information. The system internally searches for the optimal SlickEQ GE parameter settings for the case at hand, and sets SlickEQ GE’s parameters accordingly.
Operations cover a wide array of applications: Spectral matching against primitive or external references, detection and removal of static resonances, filter configuration tasks and more. Operations can be fine-tuned toward a specific FREQUENCY RANGE and total AMOUNT (both negative to positive).
Workflow
- INPUT
LEARN button starts/stops analyzing a certain section of plugin audio input. - REFERENCE (optional)
Loads an internal or external reference, as required by certain operations (e.g. Spectral Match). - OPERATION
Specifies the operation type. Note: Without active REFERENCE, some options will be inactive. Load a REFERENCE to activate them. - APPLY/CANCEL
Applies the current operation and closes the SmartOps view,
or cancels the current operation, reverts to the previous plugin state and closes the SmartOps view. - FINE TUNE
The final step intentionally involves manual fine tuning of the generated parameter settings.
Smart Operations is a flexible tool that allows generating complex signal-aware presets for SlickEQ GE. It has been designed to act like a human assistant: Taking care of tedious repetitive work, until handed over to the engineer for final verification and fine-tuning. An assistant isn’t always perfect, he usually needs supervision.
Following this analogy, Smart Ops are not meant to replace the engineer’s creativity. In the best case, they will save time, and certainly inspire!
Interface
| Smart Operations can be launched by clicking the SMART OPS button found in the plugin tollbar. |
The plugin window expands, and the SmartOps panel appears. The regular UI darkens, and can no more be controlled directly. Any Click on the darkened section will CANCEL the current operation and close the SmartOps panel. This is true with exception of the QUALITY and CHANNEL dropdowns and the main BYPASS button.

Input Learn
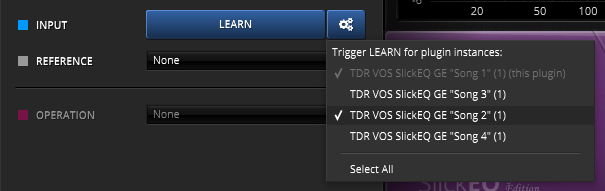
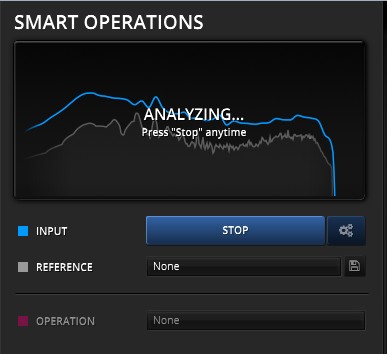 | In your audio application, start playback. Press LEARN for Smart Operations to analyze the audio input, and hit STOP anytime you consider adequate. Note: By default LEARN triggers the learn phase for all SlickEQ GE instances in the session. This is particularly important for “REFERENCE by instance” relations. Hold the “alt” or “Apple” when clicking to trigger LEARN only for the currently operated instance. |
Learn Target Menu
In addition, the Learn Target Menu button can be used to define which SlickEQ GE instances will be triggered by the LEARN button. This can be useful in mixing scenarios, or when trying to homogenize the sound of several songs within an album.
Reference
The REFERENCE and SAVE REFERENCE menu, allow loading, generating and saving external references. All matching oriented OPERATIONs depend on an active reference, as they directly compare the INPUT to the selected REFERENCE.
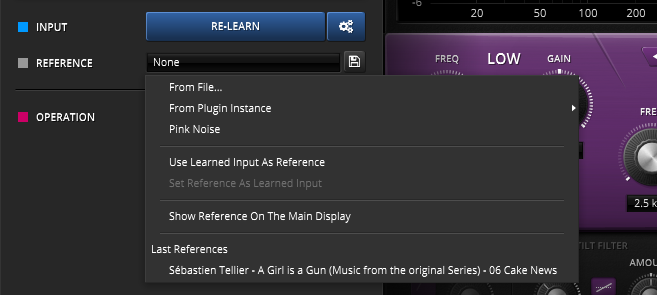
From File…
Loads an external reference from file. Supported are SlickEQ GE’s own *.slickeqgeref files and standard audio files (WAV, AIF, FLAC). Audio files are analyzed on the fly.
From Plugin Instance >
References another active SlickEQ GE instance’s learned data.
Pink Noise
Pink noise spectrum, falling 3dB per octave.
Use Learned Input As Reference
Copies the current LEARN data to REFERENCE.
Set Reference As Learned Input
Copies the REFERENCE data to LEARN.
Show Reference On The Main Display shows the reference curve on the Main Display. Any active learn curve will also be visible on the Main Display. This allows for manual matching of the learned curve to the reference curve and also for manual fine tuning of the resulting match operations.
Last References
Last saved or imported references.
Save Learned Input/Reference
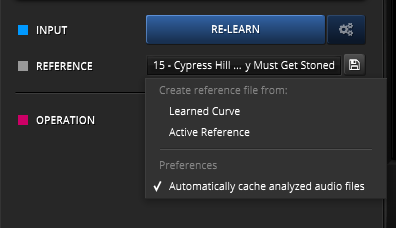 | The small SAVE REFERENCE button allows to export the active LEARN or REFERENCE data to file. The export file format is SlickEQ GE’s custom reference format (*.slickeqgeref). This menu also allows to enabled automatic caching for analyzed audio files. The cache is represented by a *. slickeqgeref file being placed aside the original audio file, and greatly speeds up analyzing previously used audio files as reference. |
Operation
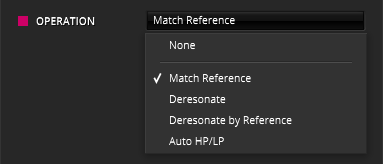 | The Operation menu now finally gives access to following operations: Match Reference matches the INPUT’s spectrum to the REFERENCE spectrum, approximately. Note: Matching requires an active REFERENCE. Deresonate finds and reduces static resonances in the signal. Resonances are defined as both static, narrow and high level spectral patterns. Note: This stands in contrast to harmonics, which move in dependence of the signal. Auto HP/LP automatically sets the HP and LP filters frequencies in accordance to the signal’s own bandwidth. |
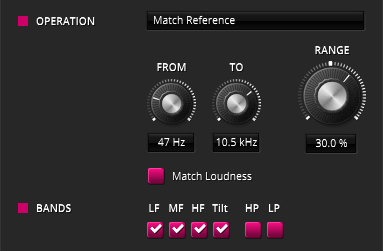 | Further fine-tuning options appear, whenever they make sense: The FROM knob controls the lower corner frequency of the bandwidth to be affected. The TO knob controls the upper corner frequency of the operation’s bandwidth. RANGE scales the extent of the operation, both positive and negative value are possible. The Match Loudness checkbox matches loudness between two the reference (only offered in Static Match, when Pink Noise not selected). In most practical cases, SlickEQ GE’s equal loudness feature will keep loudness equal in any way, and Match Loudness is not needed. |
Bands
 | The BANDS section restricts the operation to specific bands and filters. |
Cancel/Apply
 | CANCEL undoes any operation and closes the panel. APPLY closes the Smart Operation panel (and maintains the state set by the last Operation). Important: Make sure to always APPLY or CANCEL the SmartOps panel before closing the project. SmartOps do not persist across sessions, only their results do. |
Quality
 | “Full” activates SlickEQ GE’s high fidelity processing. “Eco” activates a particularly lightweight audio processing mode having almost zero latency. It doesn’t support saturation options and “phi” mode. “tilt”/”v-shape” curves are simplified and the “steep” low-pass filter shape becomes 12 dB/Oct. “Live” offers a zero latency variant. NOTE: Each quality modes imposes its own processing latency. You’ll be asked should restart audio to restart playback in order to refresh DAW latency compensation. |
Process-Target
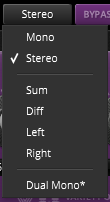 | The plugin can operate in various modes: Mono enforce in mono summing and processing. Stereo activates standard stereo processing (default). Sum and Diff modes allow processing the stereo sum or difference in an exclusive manner. That is, if Sum is selected, the EQ processes the stereo sum only and leaves the stereo difference untouched, and vice versa. If you intent to do traditional M/S processing, simply use two plugin instances, one in Sum mode, the other in Diff mode. The Left and Right modes operate in a similar exclusive manner. They allow building unlinked dual mono equalization setups, by using two instances of the plugin in series, one set to Left, the other to Right. Dual Mono* is similar to the Stereo mode, with the exception that it simulates random “manufacturing” tolerance in the internal signal processing. This effect primarily appears in the form of a subtly randomized stereo image. A random seed gets generated every time a SlickEQ GE instance is created, affecting the range of tolerances. This seed is memorized across sessions, but you can randomize it anytime, by double clicking the SlickEQ GE logo on the main interface. |
Bypass
| Bypasses the whole processor. Processor latency is accurately compensated and the actual processing is never interrupted (gap-less) to enable better comparisons. |
Help Mode
| The online help mode offers detailed information about the various elements of the user-interface. Click “?” to activate the online help and move the mouse-cursor above the control of interest. A small info bubble will ap-pear. A left-mouse click closes the help-mode again. |
Settings
| The settings button opens a dialog which gives control over additional plugin options. |
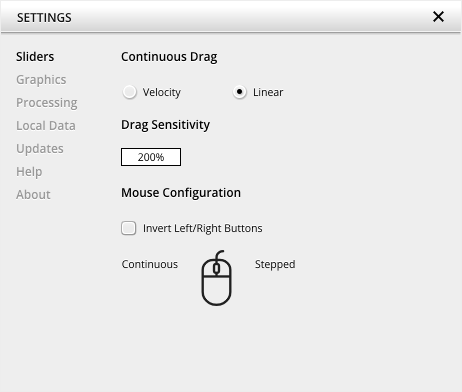
Slider allows for changing the behavior of knobs and control points in response to the mouse. Under Continuous Drag,knob and controller movement relies on mouse speed when Velocity is enabled. When Linear is enabled, knob and controller movement is proportional to mouse movement. Drag Sensitivity sets the linear sensitivity of the knob and controller movement further.
Plug-in controls, knobs, and control points can be adjusted using Left-click & drag (Continuous) and Right-click & drag (Stepped) by default. Mouse Configuration swaps the Continuous and Stepped behaviors between the left and right mouse buttons when selecting Invert Left/Right Buttons. Note that the default stepped values can be customized via the product configuration file. See “Local data” below for instructions on how to access this file.
Graphics allows for changing the interface size to a fixed percentage value between 100%, 125% and 150%.
Processing shows the plug-in latency and sample rate details. Highest quality rendering enables the option to always render at the highest Processing Quality, no matter what type is enabled in the Toolbar. See the “Processing Quality” subchapter for more details on these modes.
Registration offers access to offline and online product registration options. See the “Product Registration” chapter for more information.
Local Data allows for exporting and importing user preferences, presets, and keys, to and from other systems. Local data can also be deleted for all Tokyo Dawn Labs plug-ins using the Trash Can button.
In addition, the Folder button opens the Tokyo Dawn Labs local data folder containing all configuration files and keys. Note that these operations affect all TDR plug-ins, and not just TDR SlickEQ GE.
Updates allows to Check for updates and to Download latest version. Automatic Lookups can be enabled to Check for updates (once per day).
Help contains Documentation and Support links.
About shows the version number, build date, format, credits, and other information.
Context Menus
Standard Context Menu
 |
Right-clicking in any blank area (excluding the main display) of the interface opens the standard context menu. A click outside of the
menu closes it.
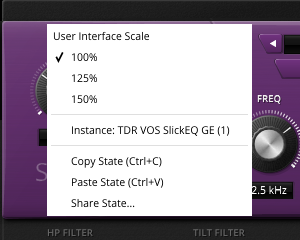
User Interface Scale sets the on-screen interface size to a fixed percentage value of 100%, 125%, or 150%. Instance allows for renaming the specific plug-in instance. Copy State (Ctrl+C) and Paste State (Ctrl+V) allows copying control states (i.e. “presets”) across plugin instances and plugin hosts. Share State opens a dialog with additional preset sharing options via e-mail or internet forums. |
Extended Context Menu
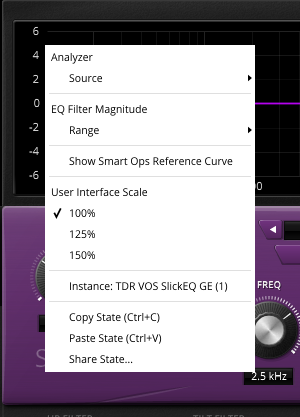 |
The extended context menu provides additional options. This can be opened by right-clicking anywhere in the frequency
magnitude display. A click outside of the menu closes it.
Analyzer provides several options for configuring.
EQ Filter Magnitude sets the Range to ±6 dB, ±12 dB, ±18 dB, ±24 dB, ±30 dB, or ±36 dB. Auto adjusts the curve to automatically fit into the display’s visible area. Show Smart Ops Reference Curve shows the reference curve and any active learn curve from the Smart Operations panel on the Main Display. User Interface Scale sets the on-screen interface size to a fixed percentage value of 100%, 125%, or 150%. Instance allows for renaming the specific plug-in instance. Copy State (Ctrl+C) and Paste State (Ctrl+V) allows copying control states (i.e. “presets”) across plugin instances and plugin hosts. Share State opens a dialog with additional preset sharing options via e-mail or internet forums. |
Custom Models
Please see the SlickEQ Custom Models Guide for further information on creating custom models.