The Concept
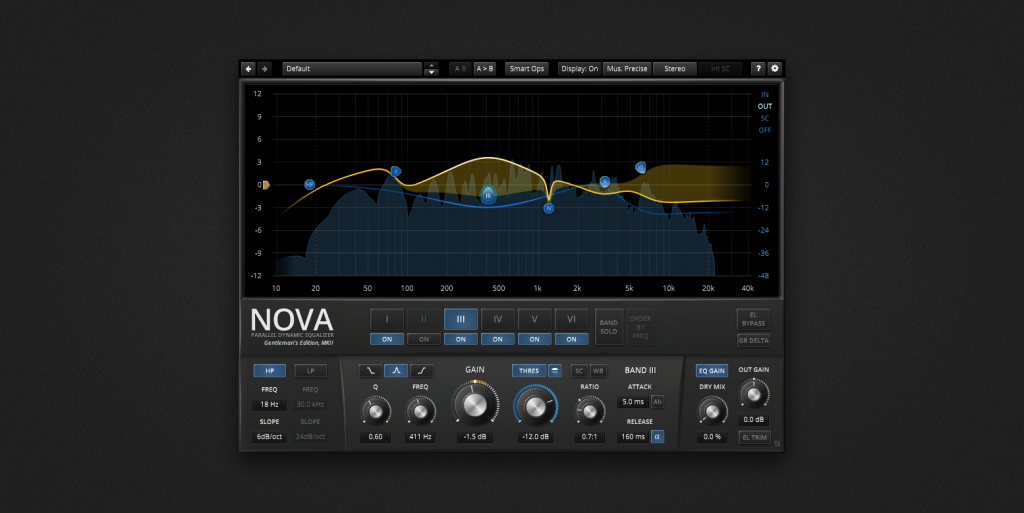
NOVA GE is a parallel dynamic equalizer. Appearing in the familiar layout of a parametric equalizer, the plugin also includes flexible dynamics processing options allowing the coverage of an impressively wide range of applications. Be it a master lacking density, the drum bus asking for more crispiness, or a sibilance problem in your perfect take: NOVA GE has an elegant musical answer.
NOVA GE includes a total of six dynamic EQ bands, each with independent dynamics processing ranging from downward compression over upward compression, upward expansion, up to downward expansion (incl. gating). Flanked by powerful highpass and lowpass filters, the processor covers a wide range of tasks:
- Parametric equalization
- Dynamic equalization
- Frequency selective compression/expansion
- Multi-band dynamics
- Wideband dynamics
In addition, advanced “Smart Operations” offer a unique way of automating and orchestrating the plugin for spectral matching, resonance removal and much more.
A user-friendly WYSIWYG drag and drop display paired with a classic “knob” interface gives quick and smooth access to the various parameters driving NOVA GE’s powerful signal processing. Elaborate equal loudness functions help finding the optimal setting without getting distracted by loudness differences. NOVA GE also features all helpers and workflow enhancements you’ve come to expect in a TDR plugin: A preset manager, undo/redo, A/B, detailed documentation, copy & paste, and more.
Signal Flow
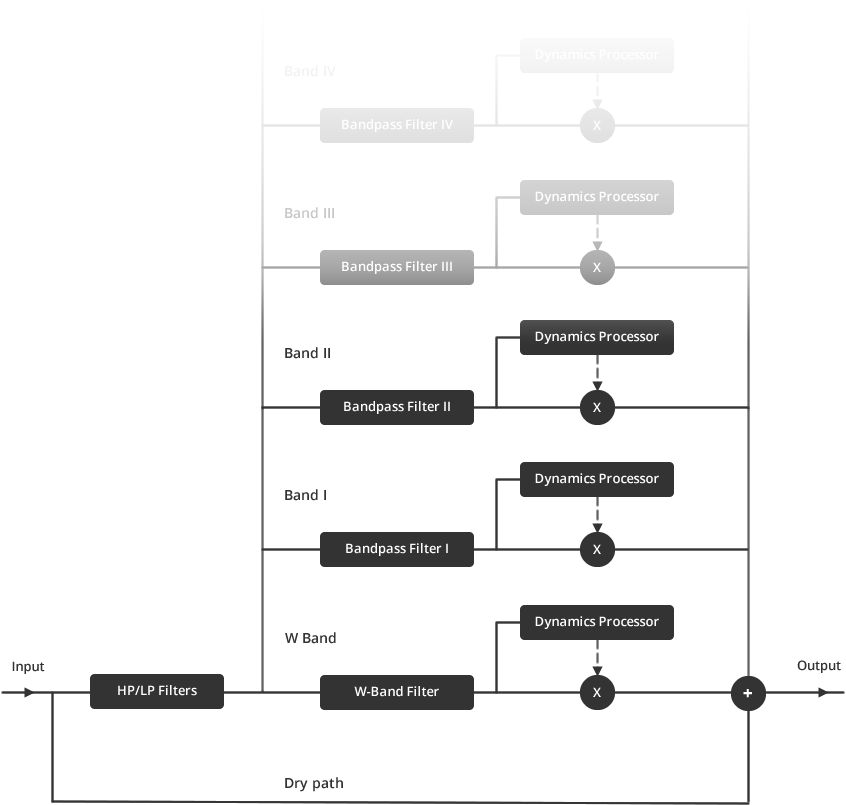
With the exception of the input highpass and lowpass filters, NOVA GE’s processing structure is fully parallel. A parallel structure provokes interesting band interactions and can severely reduce the amount of side-effects produced by nonlinear operations (such the dynamics processors running within the various bands).
An important detail of NOVA GE’s concept is the W-Band (“wide-band”). It represents part of the signal that isn’t covered by the bands. Simply speaking, the more active bands, and the wider they are, the “smaller” the W-band signal becomes. Accordingly, with all bands disabled the W-Band contains the original input signal. Changing the gain of this band allows deforming the frequency magnitude in an unusual manner.
As visible in the graph below, each band contains its own dynamics processor listening to its own band’s input. However, this relation can be changed via the SPLIT and STICKY options explained in this manual.
NOVA GE constantly compares the input loudness with the output loudness to enable the equal loudness workflows accessible via EL TRIM or EL PASS.
Hands-on Nova GE
NOVA GE supports a wide range of functions; this chapter briefly addresses most of them and describes how they can be achieved quickly. The authors hope this chapter inspires the reader to dig deeper into NOVA GE’s technical documentation!
Parametric Equalization
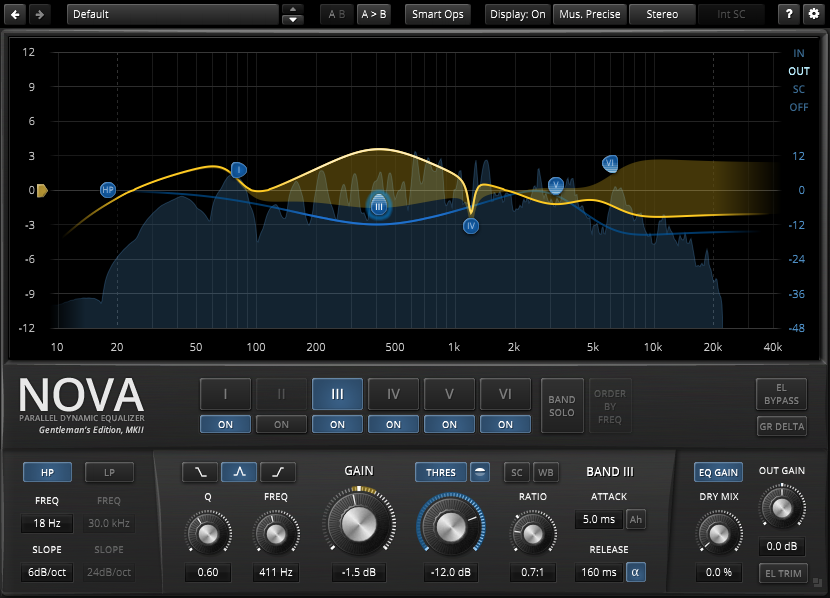
Standard parametric equalization is NOVA GE’s basic use-case. Its smooth sounding, yet precise filters can easily cover any equalization task. Each band ranges over an extremely wide FREQUENCY range from 10 Hz to 40 kHz (~12 octaves). All equalizer bands can be operated in hi-shelf/low-shelf or bell mode, with continuous control over Q and GAIN. This flexibility paired with the informative feedback from the main display make NOVA GE an exceptionally powerful equalizer.
In addition, any loudness change introduced by static equalization is compensated automatically.
Example for static equalization (the dynamics related controls are greyed-out because THRESHOLD is off):
Dynamic Equalization
NOVA GE’s equalizer bands can dynamically adjust GAIN in dependence of a sidechain signal. From a different perspective, NOVA GE can compress and/or expand arbitrary areas in the spectrum, either below or above a specific THRESHOLD. This is an excellent tool to correct a boxy low-end sound, even out resonances in a recording or reduce excessive sibilance in a vocal part. In addition, NOVA GE’s expansive ratios are a great way to spice up a boring drum loop or an over-compressed stereo mix.
The preset “LF density” is a good example of dynamic equalization:
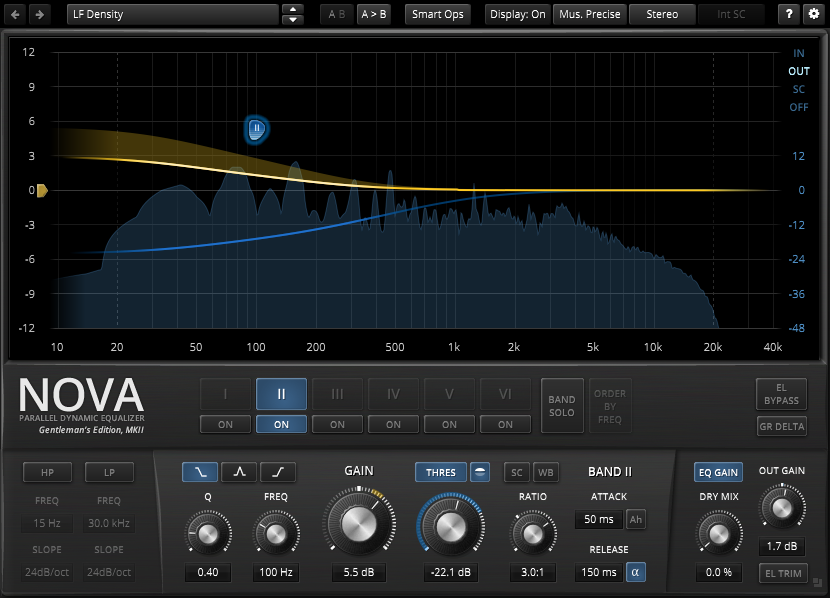
Hint: An external sidechain signal can also be fed into the plugin in order to drive the dynamics processors.
Multi-band Dynamics
NOVA GE can be operated much like a regular multi-band compressor or expander, responding to events either below or above threshold. The following presets represent good starting point for multi-band dynamics processing:
- 2 Band Dyn
- 3 Band Dyn
- 4 Band Dyn
- 5 Band Dyn
- 6 Band Dyn
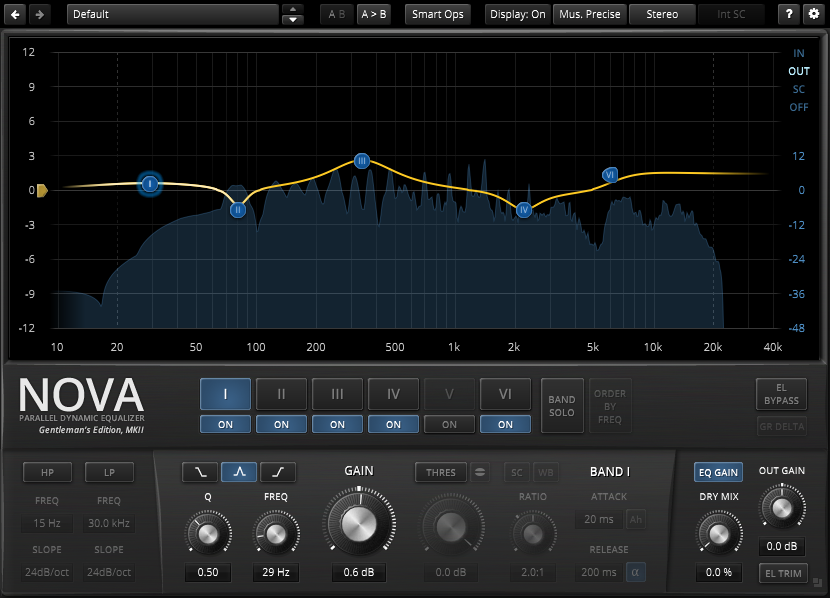
These presets have their FREQ and Q values preconfigured in such a manner that they fully cover the input bandwidth. This approximates the typical behavior expected from a crossover-based multi-band compressor. This approach is particularly well suited for a broadcast style compression often required when a dialog or stereo mix should remain audible in noisy environments. NOVA GE’s multiband capabilities can seriously increase the subjective loudness of a mix or make a lead vocal cut through a dense and busy mix.
Here’s an example for a 6 band multi-band compressor (note the flat threshold curve):
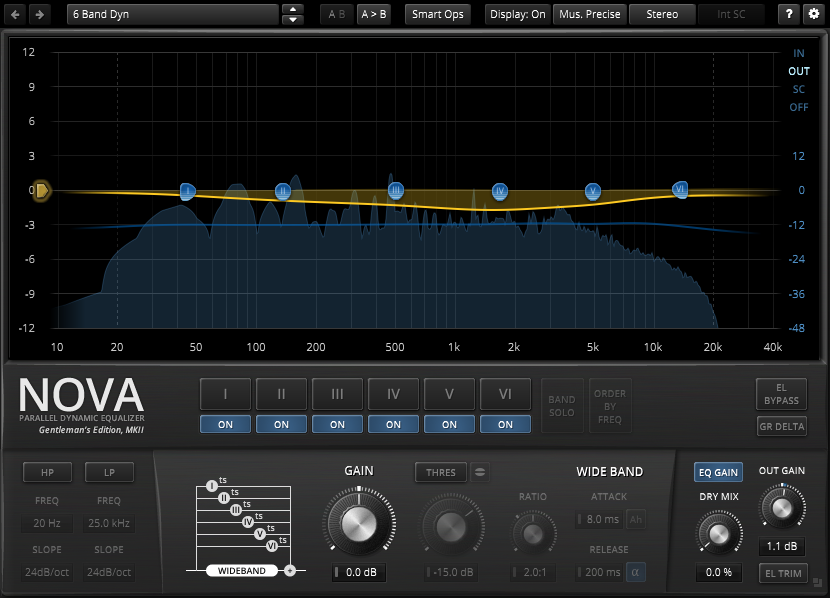
Hint: The W-band path allows creating quite exotic multi-band scenarios. For example, one band could expand the mid-band, while the W-Band dynamics section gently compresses the remaining signal.
Wideband Dynamics
NOVA GE can also operate as a wideband downward compressor, upward compressor, downward expander (or gate) and upward expander. Each with detailed control over frequency dependent behavior. For instance, bands can be excluded from wideband compression leaving their natural dynamic range untouched; this would keep the low-frequency region uncompressed for maximum impact, or prevent both high and low frequencies from being compressed to form a dynamic “smile” curve. Have a closer look at the preset “Wideband Dyn” for a demonstration of NOVA GE’s wideband compression capabilities:
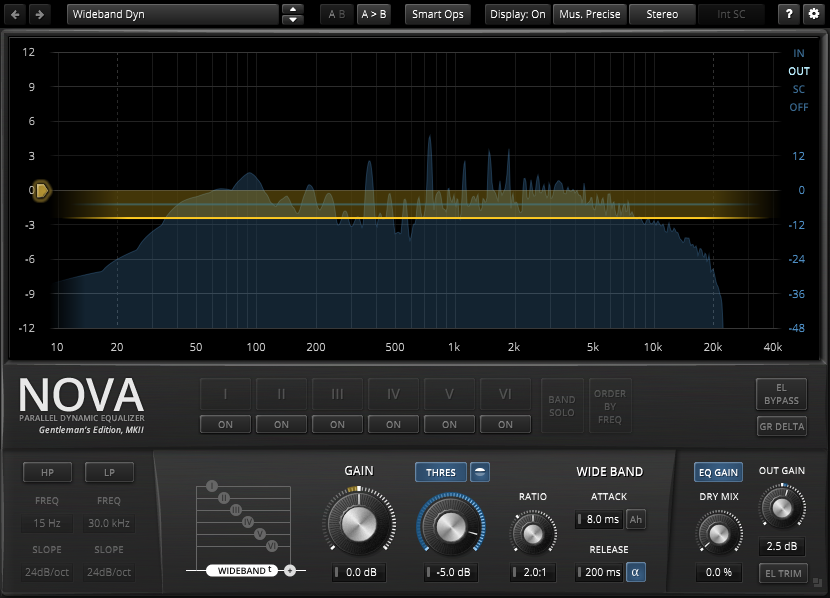
Wideband compression used in conjunction with additional split band compression allows achieving a high density while still preserving the musical balance between bands. As a result, this can be used for anything between subtle levelling and punchy, creative compression effects.
Channel Strip
NOVA GE can also be used much like a conventional channel-strip: A compressor followed by an equalizer. This is basically just a mixture of the scenarios “PARAMETRIC EQUALIZATION” and “WIDEBAND DYNAMICS” highlighted above. But it works surprisingly well in the mixing stage.
Here’s quite a complex example. What we have here is wideband compression followed by boosts from band III and V, and another boost by band IV in “Sticky” mode (which means that band IV ignores W-Band dynamics).
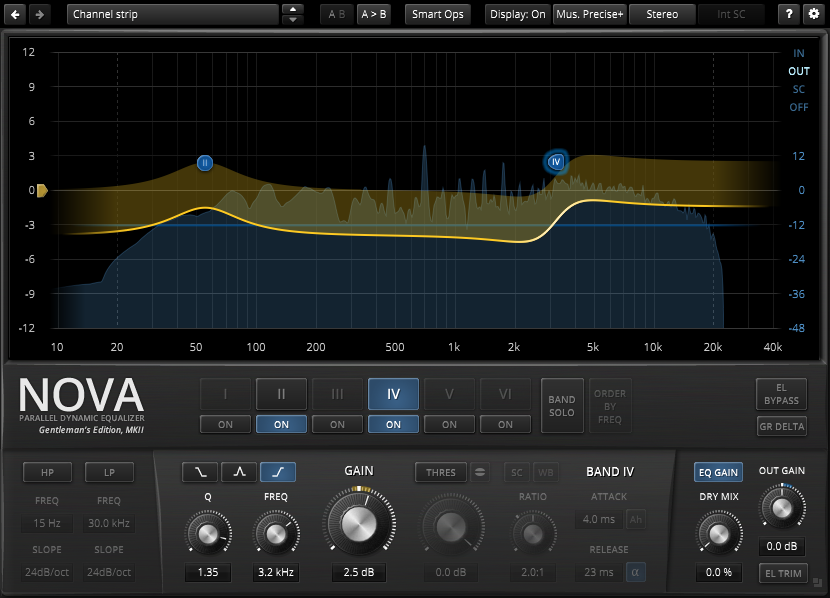
Hint: And if this doesn’t suffice, you’re still free to activate any band’s own dynamics processor!
Main Display
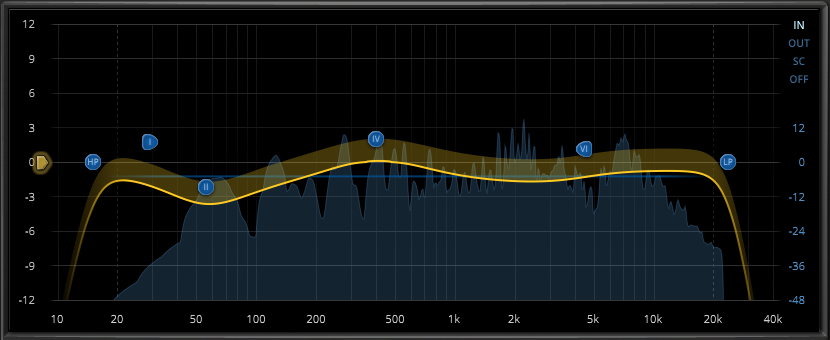
The main display provides direct feedback and access to important audio parameters. Filter parameters can be directly manipulated via drag & drop and various mouse/key modifiers, and if needed, with the help of a real-time frequency analyzer. More details below.
Scales
The horizontal axis describes FREQUENCY in a logarithmic scale.
The vertical axes describe GAIN in Decibel scale, whereby:
- The left scale relates to the overall frequency magnitude and gain reduction produced by the current setting (yellow curve and area).
- The right scale (blue) is used for the audio analyzer and threshold curves (blue line and area).
Curves
Depending on the current setting, up to six different curves appear on the display:
- The yellow curve represents the effective frequency magnitude response of the processor.
- The darker yellow area represents the gain reduction (or expansion) generated by the various dynamics processors.
- The blue line represents threshold over frequency (blue scale).
- The blue area in the background shows the analyzer’s response (blue scale).
Band Handles
Most EQ parameters can be directly manipulated by dragging band-handles around or using their various modifiers. Here’s a full overview of the various handle types and their meanings:
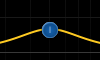 | Static EQ band, not selected. |
 | Static EQ band, selected. |
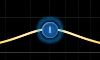
 | Compressive EQ band, linked to W-Band, selected. |
 | Selected expansive EQ band (linked to W-Band). |
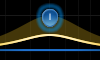
 | Compressive EQ band, SPLIT mode enabled, selected. |
 | Expansive EQ band, SPLIT mode enabled, selected. |
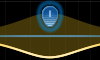
 | W-Band handle, selected. |
 | Highpass band, selected. |
 | Lowpass band, selected. |
Enabling/disabling bands
- Double click on an empty area to automatically select and enable the nearest disabled band (and move it to the current mouse position).
- Double click a band handle to deactivate it (note that inactive bands are hidden).
Selecting bands
- Click on band handle to select a band. The SHIFT modifier allows selecting groups of bands.
- Over a blank area, click and drag to draw a selection rectangle. All bands contained within the selection rectangle become selected. The selection rectangle also supports the SHIFT modifier to select/deselect whole groups of bands.
- Click a blank area to select the W-BAND.
- If no band is selected, W-BAND becomes selected.
Controlling audio parameters with band handles
- Click and drag a handle to adjust GAIN and FREQUENCY of selected band(s). Note that certain handles are restricted to one axis: The W-BAND handle can only adjust GAIN (vertically) and the HP/ LP filter handles can only adjust FREQUENCY (horizontally).
- Move the mouse-wheel over a band to adjust its Q.
- Right click a handle to cycle through filter SHAPES (shelf, bell).
- Use ALT + click to reset GAIN of selected band(s) to zero dB.
- Use SHIFT + ALT + click to fully reset all parameters of selected band(s) to default.
Band Solo
Press CTRL + SHIFT (CMD + SHIFT on a mac) to activate the solo mode for the selected bands. This mode allows previewing the effect of single bands (or groups).
Spectrum Analyzer Source
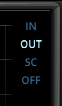 | NOVA GE’s analyzer can be connected to various sources, or disabled altogether. · In: Analyzer follows the plugin’s input. · Out: Analyzer follows the output. This is probably the most useful setting. · SC: Analyzer follows the sidechain signal. This is particularly useful when using an external sidechain signal. · Off: Disables the analyzer. |
Band Selection/Activation Row

This section features the main band selection/activation buttons. The top button row indicates the selection state. Use SHIFT + click on the band selection buttons to select multiple bands. Note that only active bands can be selected.
The second row of “ON” buttons allows to enable/disable bands.
The “BAND SOLO” switch turns on a solo mode allowing to preview the effect of the selected bands in isolation. Alternatively, pressing CTRL + SHIFT (APPLE + SHIFT on a mac) will also activate the solo mode for the selected bands.
The button labeled “ORDER BY FREQ” becomes active as soon a band’s FREQUENCY is higher than the previous band. Clicking the button re-orders all band settings by FREQUENCY.
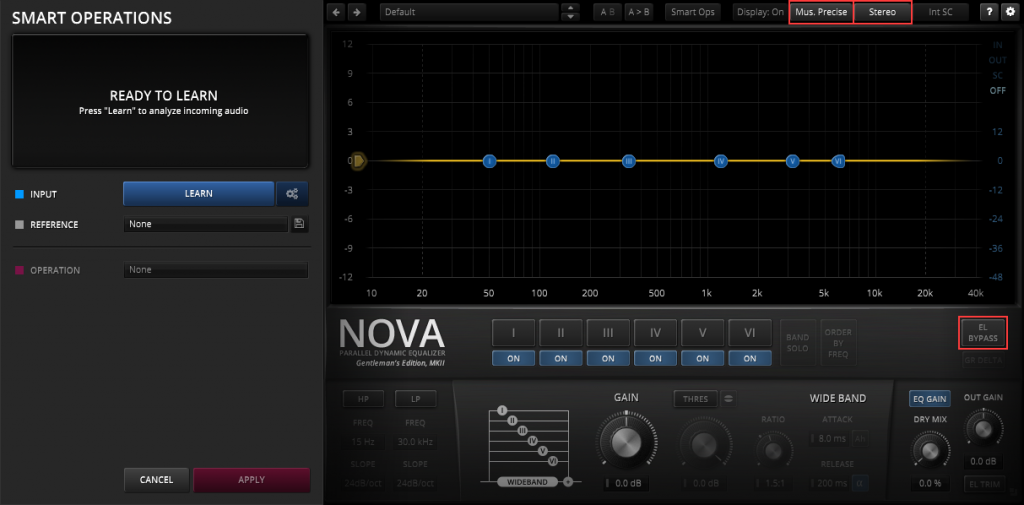
EL BYPASS (equal loudness bypass) activates a click free, latency and loudness compensated bypass.
GR DELTA (gain reduction difference) allows to “solo” the changes all dynamics processors are currently providing. This control is greyed out when no dynamics processor is running.
EQ Band Details
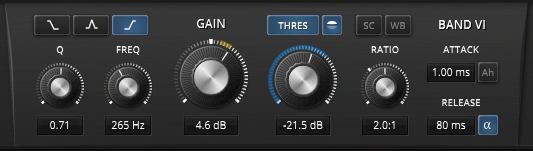
This view appears as soon as one or more bands are selected, and gives control over every parameter relevant to the selected band(s). If more than one band is selected, any changes made with the help of the details view will affect the entire group in an absolute manner. That is, turning the GAIN knob with a multiple selection with set the same GAIN value for all selected bands.
Note: The display’s band handles work differently! They affect groups in a relative manner (where the change is same for all bands).
Filter Shape
Low-shelf, Bell and High-shelf.
Q
Steepness of the selected filter shape. Low values produce large and smooth transitions, while higher values result in much narrower/steeper responses.
Frequency
The center/corner frequency of the selected band(s). Freely adjustable between 10 Hz and 40 kHz.
Hint: Use the convenient “ORDER BY FREQ” function (p.14) to reorder the bands in the familiar ascending sequence.
Gain
Controls filter gain of the selected filter shape over +/- 12 dB. Gain is applied after (dynamics) detection. A yellow circular meter indicates the amount of gain reduction applied to the current band.
Threshold (button)
Enables dynamics processing for selected band(s).
Hint: ALT + click activates the STICKY mode. This forces the band to ignore W-Band compression.
Threshold (knob)
Controls the onset of compression/expansion of selected band(s). A blue circular meter indicates the level of the sidechain signal.
Above/Below Threshold (button)
Specifies which type of events the dynamics process responds to.
Above threshold covers traditional downward compression (when RATIO > 1:1) and upward expansion (when RATIO < 1:1).
Below threshold covers upward compression (when RATIO < 1:1) and downward expansion/gating (when RATIO > 1:1).
SC (Band SC unlink button)
By default, each band’s sidechain bandpass is equal to the band’s own bandpass (e.g. expansion of the high frequencies in dependence of mid frequency events, etc).
When unlinked, two new sidechain specific text-sliders appear under the FREQ and Q controls offering independent control. Note that when unlinked, the SC bandpass always utilizes a bell shape, no matter band’s own shape.
WB (Wideband-Link button)
If pressed, the select band will use the WBAND dynamics processor. In WBAND mode, RATIO, ATTACK and RELEASE controls disappear, and the according WBAND controls appear instead.
Note: WBand controls show grey rectangles in text-editors.
Ratio
Controls dynamics ratio of selected band(s). In ABOVE THRESHOLD mode, the ratio control ranges from expansive ratios (0.5:1) over unity (1:1) up to compressive ratios (Inf:1). In BELOW THRESHOLD mode, ratio ranges from upward compression to downward expansion and gating.
Note: If WB mode is disabled, RATIO uses the WBand RATIO control (indicated by a grey knob/rectangle).
Note: NOVA GE has an implicit, ratio dependent “knee”. The knee is particularly smooth at low ratio and gradually sharpens as ratio increases.
Attack
Controls the reaction speed of the selected band(s) dynamics processor.
Note: If WBAND mode is disabled, ATTACK uses the W-Band ATTACK control (indicated by a grey rectangle).
Ah (Lookahead button)
Allows the dynamics processor to “look” a half millisecond ahead into the future. This not only allows catching very fast event, it also greatly reduces distortion at extremely fast ATTACK/RELEASE settings.
Release
Controls the recovery speed of the selected band(s) dynamics processor.
Note: If WBAND mode is disabled, RELEASE uses the W-Band RELEASE control (indicated by a grey rectangle).
Alpha (Auto Release button)
Activates a release automatism meant to reduce over-compression effects. This mechanism is generally and recommended enabled by default. In certain cases however, it can be favorable to the disable the mechanism say, to create a more obvious compression effect.
W-Band Details
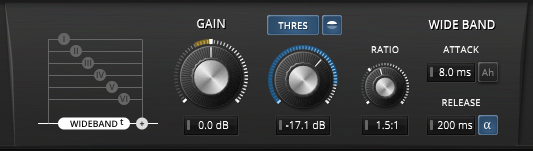
The W-Band detail view appears when no other band is selected. It gives access to all W-Band parameters and also includes a small overview of the signal path.
WBand Gain
Controls gain of the W-Band path over +/- 12 dB. Note that the W-Band signal varies depending on filter settings; it does not represent overall gain (use the OUT GAIN control instead). A yellow circular meter indicates the amount of gain reduction applied to the W-Band path.
WBand Threshold (button)
Activates dynamics processing for selected band(s).
WBand Above/Below Threshold (button)
Specifies which type of events the dynamics process responds to.
Above threshold covers traditional downward compression (when RATIO > 1:1) and upward expansion (when RATIO < 1:1).
Below threshold covers upward compression (when RATIO < 1:1) and downward expansion/gating (when RATIO > 1:1).
WBand Threshold (knob)
Controls the onset of compression/expansion of selected band(s). A blue circular meter indicates the level of the sidechain signal.
WBand Ratio
Controls the dynamics ratio of selected band(s). The ratio control ranges from expansive ratios (0.5:1) over unity (1:1) up to compressive ratios (10:1).
Note: NOVA GE has an implicit, ratio dependent “knee”. The knee is particularly smooth at low ratio and gradually sharpens as ratio increases.
WBand Attack
Controls the reaction speed of the W-Band dynamics processor.
WBand Ah (Lookahead button)
Allows the dynamics processor to “look” a half millisecond ahead into the future. This not only allows catching very fast event, it also greatly reduces distortion at extremely fast ATTACK/RELEASE settings.
WBand Release
Controls the recovery speed of the W-Band dynamics processor.
WBand Auto Release (button)
Activates a release automatism meant to reduce over-compression effects. This mechanism is generally and recommended enabled by default. In certain cases however, it can be favorable to the disable the mechanism say, to create a more obvious compression effect
Input/Output Controls
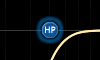
Highpass Filter
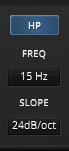 | The HP button activates a highpass filter. Use the FREQ control to adjust the filter’s corner frequency. Filter steepness can be controlled in seven steps via the SLOPE drop-down. Hint: All HP parameters can also be edited via the main display. FREQ can be adjusted by dragging the HP handle horizontally, a right mouse click over the handle cycles through all slopes. |
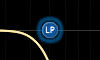
Lowpass Filter
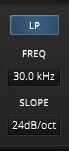 | The LP button activates a lowpass filter. Use the FREQ control to adjust the filter’s corner frequency. Filter steepness can be controlled in seven steps via the SLOPE drop-down. Hint: All LP parameters can also be edited via the main display. FREQ can be adjusted by dragging the HP handle horizontally, a right mouse click over the handle cycles through all slopes. |
Dry Mix
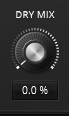 | The DRY MIX control allows mixing the original with the processed output, whereby 0.0% means that no dry signal is added to the output, 50.0% indicates an equal mix of dry and wet signals, and 100% is equivalent to BYPASS. Note: The HP and LP filters are not affected by the DRY MIX control. This is because the dry signal is delayed differently (a distorted phase response) than the wet signal. |
Output Gain
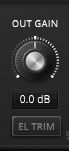 | OUT GAIN controls the output level of the plugin. A circular meter indicates the required knob position to attain an equal perceived loudness for both the input and output of NOVA GE. EL TRIM (equal loudness trim) allows trimming the output gain to match the input loudness. Note that the estimation needs a certain time to settle and work accurately. EQ GAIN (equalizer loudness compensation) enables/disables the automatic gain compensation mechanism of NOVA GE’s filters. Note that this compensation only affects static EQ changes. |
Toolbar
Undo/Redo
| Use the undo/redo buttons to navigate previous control states. The exact event is shown in a tooltip. Note that certain controls are not tracked by this function (e.g. “Bypass”), as that would not make much sense. |
Preset Management
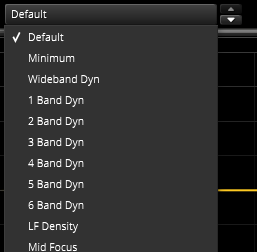 | The preset drop-down list offers quick access to factory settings and user presets. Alternatively, the up/down buttons allow you to cycle through the presets. |
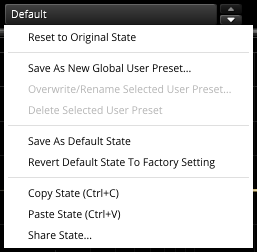 | Advanced preset management options are available from the context menu (right-click). Reset to Original state resets the currently active preset to its original state. Save As New Global User Preset opens a dialog used to create User Presets. Note that these presets persist across sessions and DAWs (presets are saved on your machine). The total amount of user presets is limited to 20. Copy and Paste allow copying control states (i.e. “presets”) across plugin instances and plugin hosts. Additionally, Share State opens a dialog with additional preset sharing options via e-mail or internet forums. These three options are available in the standard context menu as well. |
A/B Control
| A/B allows comparison of two alternative control settings. A>B and B<A copies one state over the other. |
Smart Ops
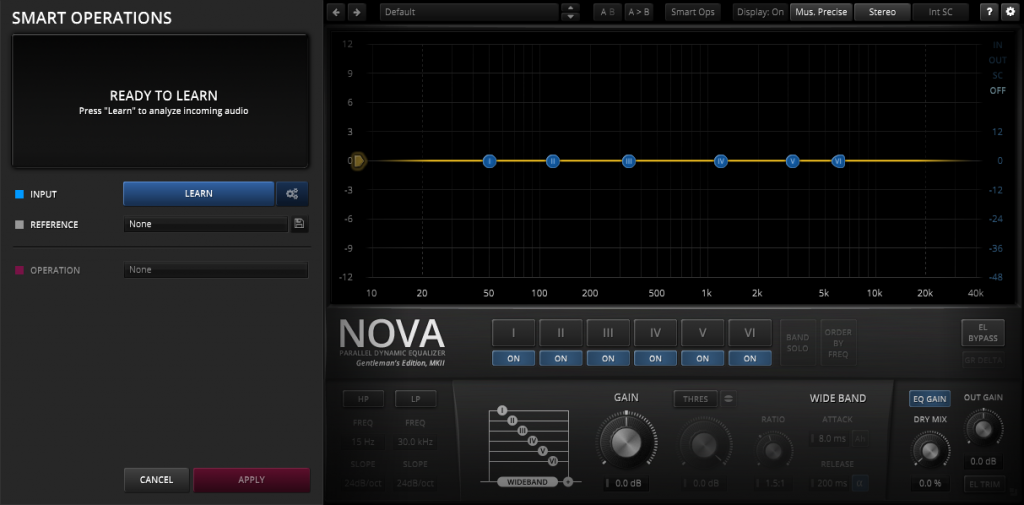
Smart Operations analyze the audio input’s spectral properties and allow running Operations in dependence of this information. The system internally searches for the optimal Nova GE parameter settings for the case at hand, and sets Nova GE’s parameters accordingly.
Operations cover a wide array of applications: Spectral matching against primitive or external references, detection and removal of static resonances, filter configuration tasks and more. Operations can be fine-tuned toward a specific FREQUENCY RANGE and total AMOUNT (both negative to positive).
Workflow
- INPUT
LEARN button starts/stops analyzing a certain section of plugin audio input. - REFERENCE (optional)
Loads an internal or external reference, as required by certain operations (e.g. Spectral Match). - OPERATION
Specifies the operation type. Note: Without active REFERENCE, some options will be inactive. Load a REFERENCE to activate them. - APPLY/CANCEL
Applies the current operation and closes the SmartOps view,
or cancels the current operation, reverts to the previous plugin state and closes the SmartOps view. - FINE TUNE
The final step intentionally involves manual fine tuning of the generated parameter settings.
Smart Operations is a flexible tool that allows generating complex signal-aware presets for Nova GE. It has been designed to act like a human assistant: Taking care of tedious repetitive work, until handed over to the engineer for final verification and fine-tuning. An assistant isn’t always perfect, he usually needs supervision.
Following this analogy, Smart Ops are not meant to replace the engineer’s creativity. In the best case, they will save time, and certainly inspire!
Interface
The plugin window expands, and the SmartOps panel appears. The regular UI darkens, and can no more be controlled directly. Any Click on the darkened section will CANCEL the current operation and close the SmartOps panel. This is true with exception of the QUALITY and CHANNEL drop-downs and the main BYPASS button.
| Smart Operations can be launched by clicking the SMART OPS button found in the plugin toolbar. |
Input Learn
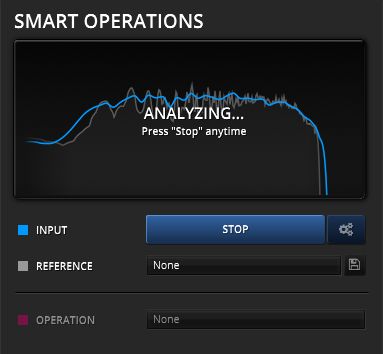 | In your audio application, start playback. Press LEARN for Smart Operations to analyze the audio input, and hit STOP anytime you consider adequate. Note: By default LEARN triggers the learn phase for all Nova GE instances in the session. This is particularly important for “REFERENCE by instance” relations. Hold the “alt” or “Apple” when clicking to trigger LEARN only for the currently operated instance. |
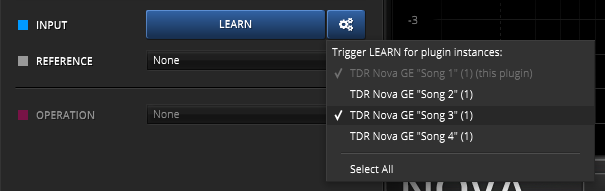
Learn Target Menu
In addition, the Learn Target Menu button can be used to define which Nova GE instances will be triggered by the LEARN button. This can be useful in mixing scenarios, or when trying to homogenize the sound of several songs within an album.
Reference
The REFERENCE and SAVE REFERENCE menu, allow loading, generating and saving external references. All matching oriented OPERATIONs depend on an active reference, as they directly compare the INPUT to the selected REFERENCE.
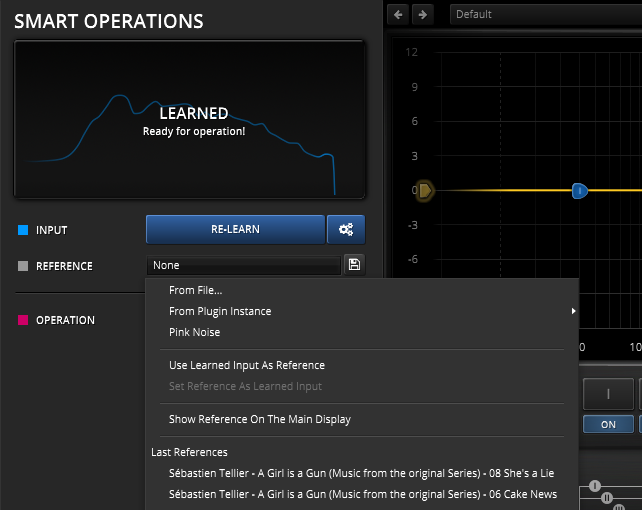
From File…
Loads an external reference from file. Supported are Nova GE’s own *.novageref files and standard audio files (WAV, AIF, FLAC). Audio files are analyzed on the fly.
From Plugin Instance >
References another active Nova GE instance’s learned data.
Pink Noise
Pink noise spectrum, falling 3dB per octave.
Use Learned Input As Reference
Copies the current LEARN data to REFERENCE.
Set Reference As Learned Input
Copies the REFERENCE data to LEARN.
Show Reference On The Main Display shows the reference curve on the Main Display. Any active learn curve will also be visible on the Main Display. This allows for manual matching of the learned curve to the reference curve and also for manual fine tuning of the resulting match operations.
Last References
Last saved or imported references.
Save Learned Input/Reference
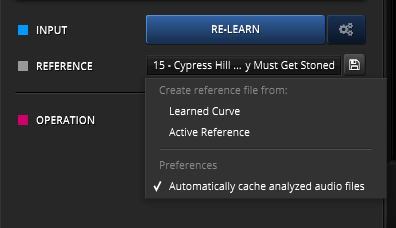 | The small SAVE REFERENCE button allows to export the active LEARN or REFERENCE data to file. The export file format is Nova GE’s custom reference format (*.novageref). This menu also allows to enabled automatic caching for analyzed audio files. The cache is represented by a *. novageref file being placed aside the original audio file, and greatly speeds up analyzing previously used audio files as reference. |
Operation
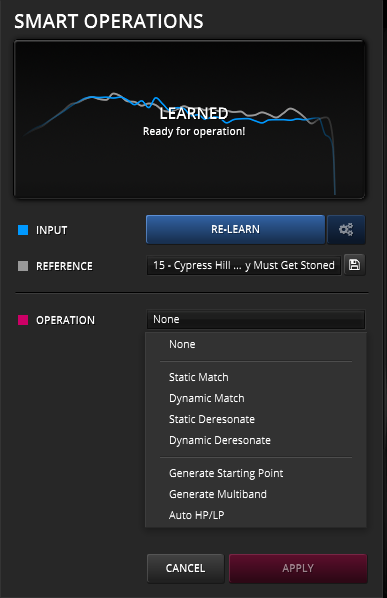 | The Operation menu offers access to following operations: Static Match matches the INPUT’s spectrum to the REFERENCE spectrum, approximately. This is restricted to static means only, i.e. static EQing and filtering. Note: Matching requires an active REFERENCE. Dynamic Match is similar to Static Match, but is allowed to use Nova GE’s dynamics. Note: Matching requires an active REFERENCE. Static Deresonate finds and reduces static resonances in the signal. Resonances are defined as both static, narrow and high level spectral patterns. Note: This stands in contrast to harmonics, which move in dependence of the signal. Dynamic Deresonateis similar to Static Deresonate, but tries to reduce these resonances only when they appear. Generate Starting Point searches for prominent content in the signal and sets the EQ bands to their center frequencies and bandwidths. Generate Multiband generates an equally spaced, “flat sum” multiband setting. Auto HP/LP automatically sets the HP and LP filters frequencies in accordance to the signal’s own bandwidth |
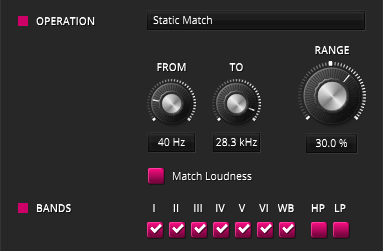 | Further fine-tuning options appear, whenever they make sense: The FROM knob controls the lower corner frequency of the bandwidth to be affected. The TO knob controls the upper corner frequency of the operation’s bandwidth. RANGE scales the extent of the operation, both positive and negative value are possible. The Match Loudness checkbox matches loudness between two the reference (only offered in Static Match, when Pink Noise not selected). In most practical cases, Nova GE’s equal loudness feature will keep loudness equal in any way, and Match Loudness is not needed. |
Bands
 | The BANDS section restricts the operation to specific bands and filters. |
Cancel/Apply
 | CANCEL undoes any operation and closes the panel. APPLY closes the Smart Operation panel (and maintains the state set by the last Operation). Important: Make sure to always APPLY or CANCEL the SmartOps panel before closing the project. SmartOps do not persist across sessions, only their results do. |
Display On/Off
| Shows/hides the main frequency magnitude display. |
Process-Quality and Curve Type
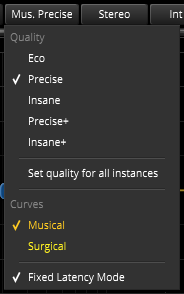 | NOVA GE offers five different Quality modes. These primarily affect anti-aliasing: · Eco: Economic mode, with an internal bandwidth ~100kHz · Precise: Default quality, with an internal bandwidth ~200kHz · Insane: Very high quality, with an internal bandwidth ~400kHz · Precise+: Precise quality, with internal nonlinearity. · Insane+: Insane quality, with internal nonlinearity. Set quality for all instances sets the currently selected quality mode to all instances of the plugin. Curves allows for selecting a Musical curve mode or Surgical curve mode. See Appendix A for more detailed information. Fixed Latency Mode compensates for the dynamic latency changes from the Ah (Lookahead) on/off parameter. |
Process-Target
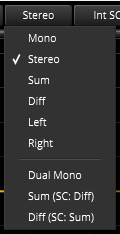 | The audio input can be processed in various channel modes: – Mono forces (sums) any input to mono, independently of the plugin host’s channel configuration. – Stereo represents conventional LR processing. – Sum and Diff represents either “Mid” or “Side” processing accordingly. Note that this processing is exclusive in the sense that only the selected target is processed, while the other is left untouched. – Similarly, Left and Right allow the left or right channels to be processed exclusively. Hint: Sum, Diff, Left and Right modes allow simultaneous and fully independent processing of each channel by simply adding multiple instance of NOVA GE in series and using either exclusive processing mode. The CPU load of two instances each processing Left/Right independently will not be much higher than the CPU load of a single instance operating in Stereo mode. – Dual Mono unlinks all dynamics processors. This is to be used with caution, as unlinked dynamics processors operating on a stereo signal is likely to produce in an irreversible, instable stereo center in the best case, up to weird level dependent auto-pan in the worst case. – Sum (SC:Diff) like Sum, except that the dynamics processors listen to Diff signal. – Diff (SC:Sum) like Diff, except that the dynamics processors listen to Diff signal. Hint: The last two “cross-sidechain” mode are particularly well suited at created powerful stereo wideners. E.g. expand Diff only if Sum is above a certain level, and so on. |
Sidechain Input
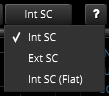 | The sidechain-input dropdown allows using an external signal to drive NOVA GE’s sidechain. – INT SC: Internal sidechain input. NOVA GE uses the input signal to drive the dynamics processor. – EXT SC: External sidechain input. NOVA GE uses an external signal to drive the dynamics processor. – INT SC (flat): Internal sidechain input, without SC filter. Note: The sidechaining abilities vary greatly across plugin formats and plugin hosts. |
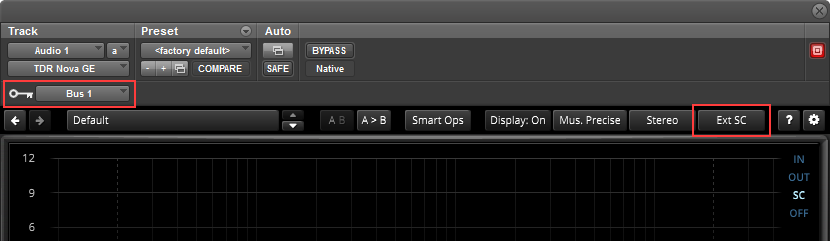
External Sidechain VST 2 / REAPER
- In REAPER, send any “key” signal to the source track’s channel 3 and 4.
- Select “EXT SC” in NOVA GE’s toolbar.


Note: In order to work, plugin host must support multi-input plugins. Sadly, only few s support multiple plugin inputs. Reaper is probably the most popular example.
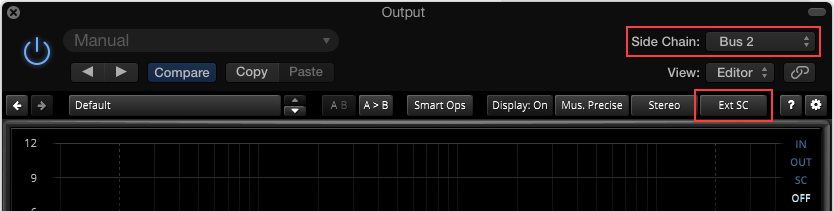
External Sidechain in AU / Logic
- In Logic’s plugin window, assign a bus to operate as a sidechain signal.
- Select “EXT SC” in NOVA GE’s toolbar.
External Sidechain in AAX / Pro Tools
- In Pro Tools’ plugin window, assign a bus to operate as a sidechain signal.
- Select “EXT SC” in NOVA GE’s toolbar.
Note: AAX sidechains are always mono.
Help
| The dynamic help mode offers detailed information about the various elements of the user-interface. Click “?” to activate the online help and move the mouse-cursor over the control of interest. A small info bubble will appear. Another left- click closes the help mode. |
Settings
| The settings button opens a dialog which gives control over additional plugin options. |
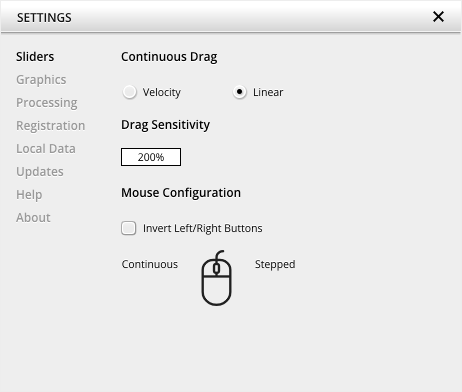
Slider allows for changing the behavior of knobs and control points in response to the mouse. Under Continuous Drag,knob and controller movement relies on mouse speed when Velocity is enabled. When Linear is enabled, knob and controller movement is proportional to mouse movement. Drag Sensitivity sets the linear sensitivity of the knob and controller movement further.
Plug-in controls, knobs, and control points can be adjusted using Left-click & drag (Continuous) and Right-click & drag (Stepped) by default. Mouse Configuration swaps the Continuous and Stepped behaviors between the left and right mouse buttons when selecting Invert Left/Right Buttons. Note that the default stepped values can be customized via the product configuration file. See “Local data” below for instructions on how to access this file.
Graphics allows for changing the interface size to a fixed percentage value between 100%, 125% and 150%.
Processing shows the plug-in latency and sample rate details. Highest quality rendering enables the option to always render at the highest Processing Quality, no matter what type is enabled in the Toolbar. See the “Processing Quality” subchapter for more details on these modes.
Registration offers access to offline and online product registration options. See the “Product Registration” chapter for more information.
Local Data allows for exporting and importing user preferences, presets, and keys, to and from other systems. Local data can also be deleted for all Tokyo Dawn Labs plug-ins using the Trash Can button.
In addition, the Folder button opens the Tokyo Dawn Labs local data folder containing all configuration files and keys. Note that these operations affect all TDR plug-ins, and not just TDR Nova GE.
Updates allows to Check for updates and to Download latest version. Automatic Lookups can be enabled to Check for updates (once per day).
Help contains Documentation and Support links.
About shows the version number, build date, format, credits, and other information.
Context Menus
Standard Context Menu
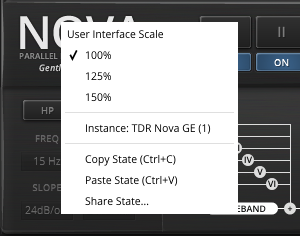 |
Right-clicking in any blank area (excluding the main display) of the interface opens the standard context menu. A click outside of the menu closes it.
User Interface Scale sets the on-screen interface size to a fixed percentage value of 100%, 125%, or 150%. Instance allows for renaming the specific plug-in instance. Copy State (Ctrl+C) and Paste State (Ctrl+V) allows copying control states (i.e. “presets”) across plugin instances and plugin hosts. Share State opens a dialog with additional preset sharing options via e-mail or internet forums. |
Extended Context Menu
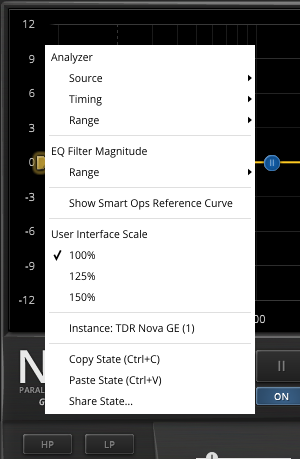 |
The extended context menu provides additional options. This can be opened by right-clicking anywhere in the main display. A click outside of the menu closes it.
Analyzer provides several options for configuring.
EQ Filter Magnitude sets the Range to ±12 dB or ±24 dB. Show Smart Ops Reference Curve shows the reference curve and any active learn curve from the Smart Operations panel on the Main Display. User Interface Scale sets the on-screen interface size to a fixed percentage value of 100%, 125%, or 150%. Instance allows for renaming the specific plug-in instance. Copy State (Ctrl+C) and Paste State (Ctrl+V) allows copying control states (i.e. “presets”) across plugin instances and plugin hosts. Share State opens a dialog with additional preset sharing options via e-mail or internet forums. |
Mouse Control Behavior
All controls within the plugin feature acceleration. Fast movements of the mouse make large changes and slow, small movements allow for fine tuning of settings. Alternatively, it is possible to revert the knob behavior back to a linear mode. Open the settings dialog to access these options.
Press either Alt-click or Double-click a control to reset to its default value.
Appendix A
Curve Modes
Nova GE supports two different curve modes “Musical” (Nova default) and “Surgical” (very precise and predictable, but more CPU intensive).
Musical Curve Mode
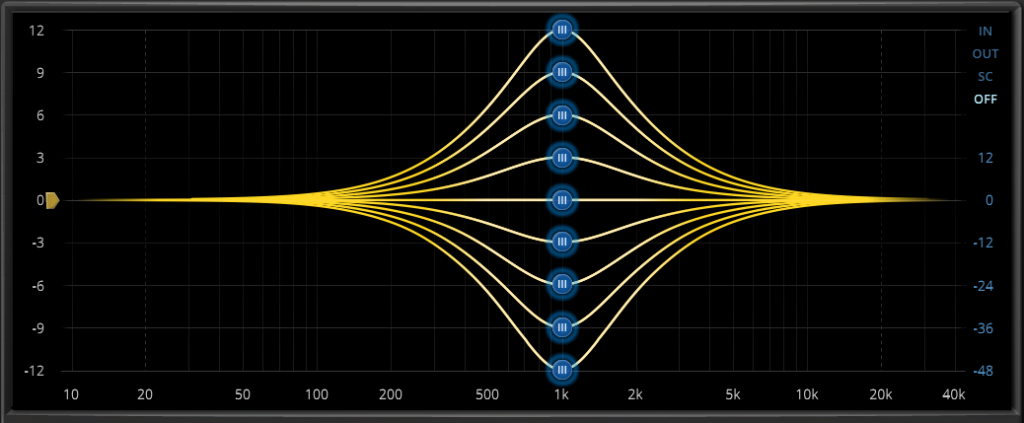
While implemented in a parallel manner, Nova’s filters standard curve mode delivers symmetric curves and a constant Q:

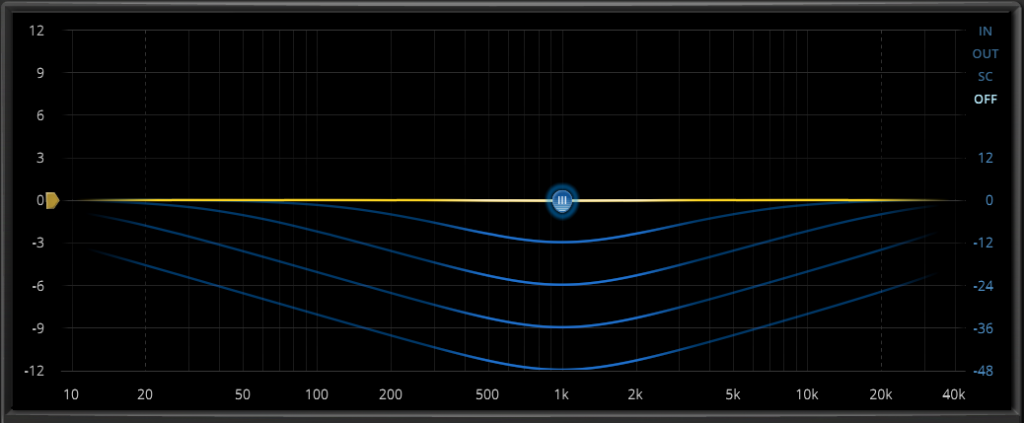
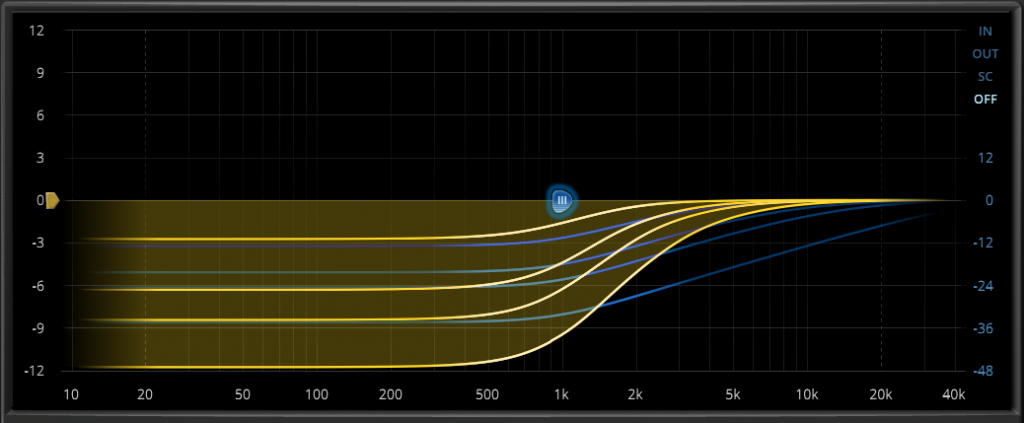
However, dynamic filters don’t conform to these conditions. Here’s the Threshold curve for peaking filters…
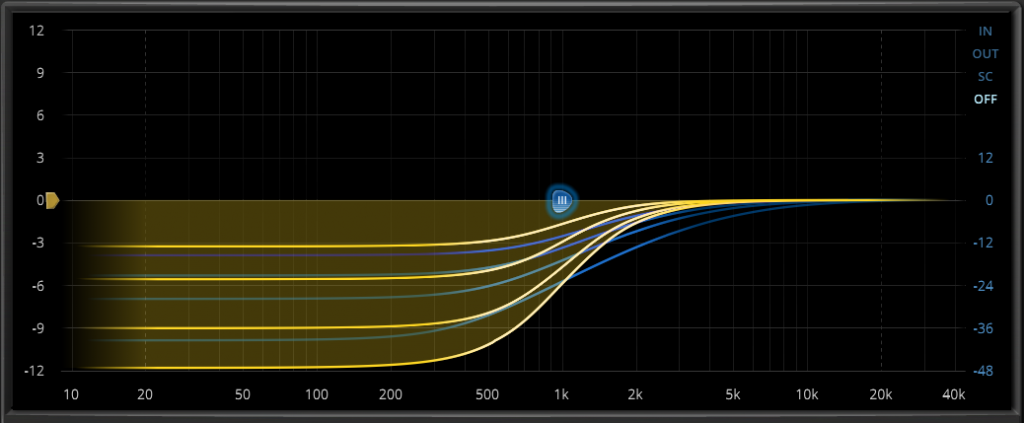
…and shelving filters…
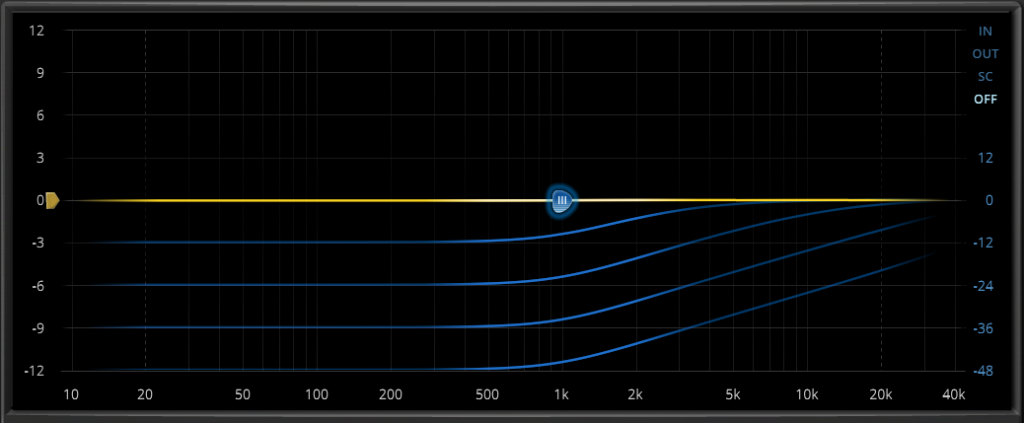
Peaking filters’ Q for threshold decreases with gain (“inverse proportional Q behavior”). For shelving filters, we see the corner frequency seemingly being shifted in dependence of gain.
While this behavior is absolutely normal for parallel equalizers and certainly contributes to their “musical” feel, surgical operations are complex and require manual reducing Q value and shifting the shelving filter frequency in operational gain reduction range.
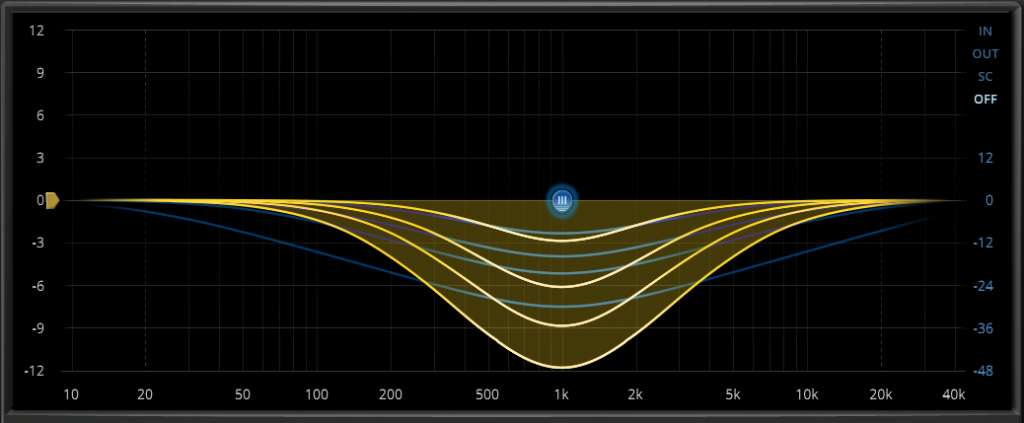
Let’s examine the effect during dynamic gain reduction:
Surgical Curve Mode
Contrary to the musical mode, the surgical curve mode is capable of maintaining a constant Q condition throughout the process, under any circumstance. Further, the corner frequency remains static and predictable.
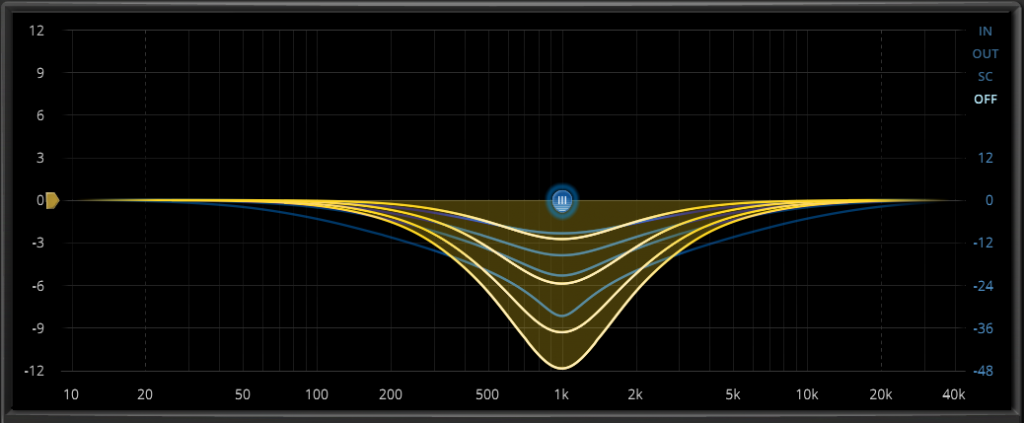
The Q value is the same as before but the threshold curve becomes narrower as threshold deepens. The dynamic EQ curve maintains its constant Q property.
The surgical curve mode is very useful for precise operations such as deep de-essing, the neighbor frequencies are much less affected. The main drawback is a greater CPU load.