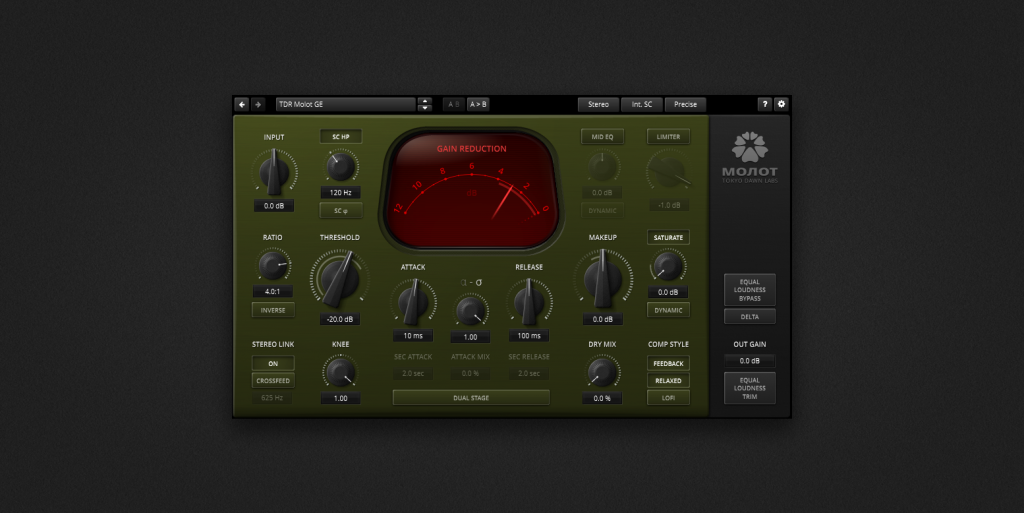
The Concept
Russian for “Hammer”, Molot is the name of a popular dynamic compressor originally released in 2011 by Vladislav Goncharov. With a modernized concept, extended flexibility, and a generous dose of Rock ’n Roll, Molot GE proudly takes over the job of its predecessor.
Molot GE is a particularly characterful dynamic range compressor melding several classic compression mechanisms with sophisticated saturation, creative tone control, and a snappy peak limiter. Whether it be mellow leveling, tight dynamic control, or aggressively vibrant compression, Molot GE covers a remarkable wide range of compression colors. This flexibility makes it suited for almost any source, be it drums needing more crisp and impact, solidification and enrichment of vocals, or the enhancement of guitar and bass recordings of all types.
As with all TDR plugins, Molot GE employs state of the art audio processing technology while keeping unwanted distortion under strict control. An intuitive and well documented user interface offers quick access to all relevant parameters in a rewarding manner. Several helpers such as the equal loudness bypass and trimming, unlimited undo/redo, optional stepped controls, and many more features help the operator achieve consistent results within a short time.
While Molot GE doesn’t emulate any “vintage” device, its sound and behavior was definitely inspired by their most interesting musical peculiarities.
Controls
Resetting Controls to Default Preset Values
 | Any control can be reset to its default preset position and value. This default position is visibly marked around rotary controls and is the value that was saved with the preset. |
 | The default position or value of a control will change based on the value it was saved at as a preset. |
To reset a rotary control:
- Alt-click (Windows), Option-click (macOS), or Double-click directly on the rotary control.
To reset a control value field:
- Alt-click (Windows) or Option-Click (macOS) directly on the control value field.
Control Functions
To facilitate understanding of the control functions, the following is split into three parts:
Basic Controls
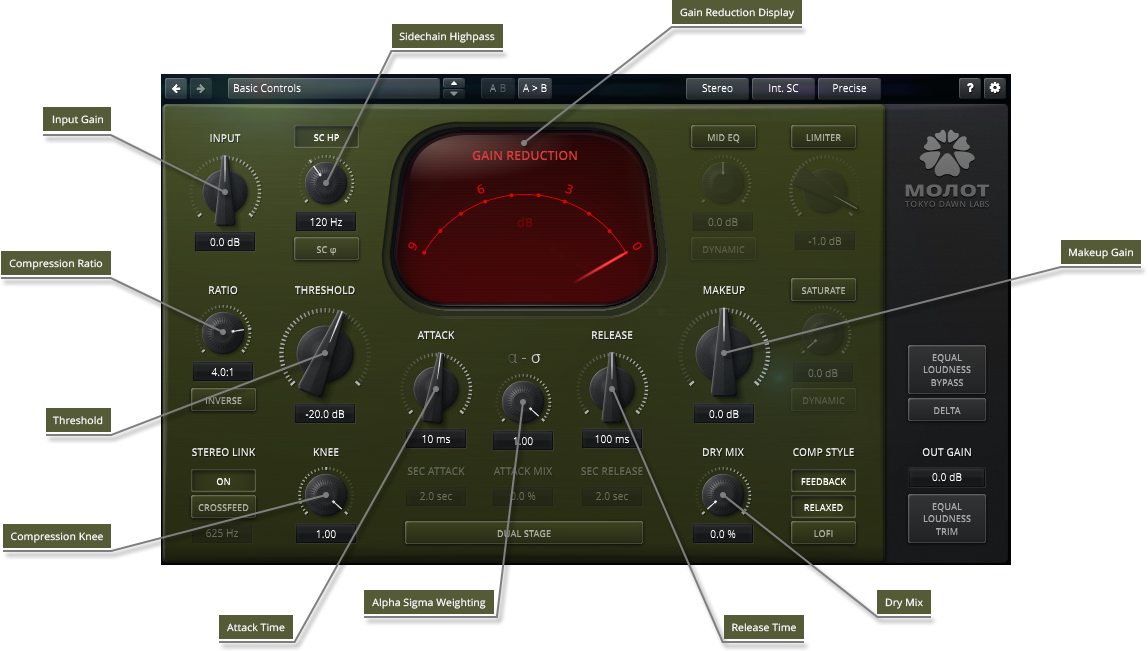
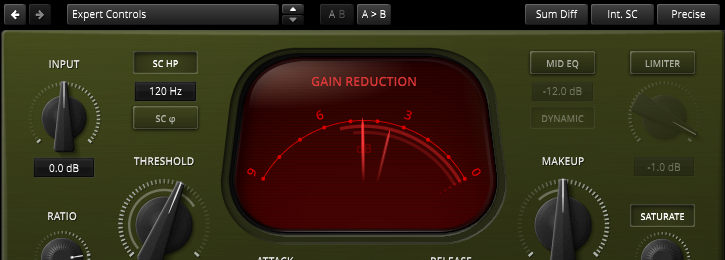
Threshold
 | Threshold sets the level where the input signal must pass for the compression to begin. The position of this point depends on what you’re trying to achieve:
|
 | Tip: The circular input level meter around the Threshold knob can be used to set the threshold position. |
Input
 | Input allows you to boost or attenuate the input signal before processing. Instead of using the threshold knob to set the compression point you can boost the input signal instead. When setting compression using the threshold knob the output signal becomes quieter due to the gain reduction. If you use the input gain for this adjustment instead, then the output signal will become louder. In both cases some compensation is needed. While some users prefer boosting the input gain instead of adjusting the threshold parameter, other users may utilize both controls together. Note: Molot compressor internally operates in a linear scale, while a more scientific approach to compression is to operate in a logarithmic (dB) scale. This leads to slight differences in sound when using threshold based or input gain based compression adjustments. If you’re unsure which method to use, start with threshold based compression. |
Makeup
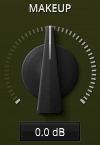 | Makeup allows you to adjust the signal level to compensate for changes in loudness caused by gain reduction. |
 | Tip: The circular meter around the Makeup knob increases counterclockwise to indicate gain reduction. It also rotates jointly during knob changes to display post compression gain adjustments. It can be used as a guide to compensate for the change in signal level by keeping the 0 dB point in the center area of the the meter’s line. |
Gain Reduction Display

The Gain Reduction Display is a VU-style meter that can show either the “gain reduction” mode or the “total gain” mode. Click on the mode name to toggle between the two. In “gain reduction” mode the meter displays the gain reduction caused by the compression. In “total gain” mode the action is similar to the makeup knob circular meter, which shows the gain change caused by the input gain, the compressor’s gain reduction, and the makeup gain. The meter scale range functions automatically but can also be manually changed by clicking on the left or right side of the meter.
Tip: Right-click on the Gain Reduction Display to open its context menu. Here you can set the meter mode and meter range.
Tip: Hover the mouse over the Gain Reduction Display then use the scroll wheel to set the meter range.
Attack
 | Attack sets the speed of gain reduction. Setting the attack to low values will prevent transients from passing through, but at the expense of creating higher distortion levels. For extremely short values, less than 1 ms, the compressor becomes a distortion generator. Tip: Adjust the attack time to where it sounds natural while also enhancing the original sound. |
α–σ (Alpha–Sigma) Weighting
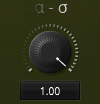 | α–σ (alpha–sigma) weighting sets the attack curve shape. In “alpha” mode the compressor reacts almost immediately. In “sigma” mode the compressor action is delayed and the attack passes through almost untouched. “Sigma” mode also has less distortion added to the signal. Tip: If you’re using the compressor for transient suppression then “alpha” mode is recommended. If you’re using the compressor for transient shaping then “sigma” mode is recommended. Note: “Sigma” mode brings about the sound that Molot is famous for. |
Release
 | Release sets the time that needs to pass for the compression to return to unity after the input signal drops below the threshold level. There might be a tendency to set fast release times in order to avoid over-compression. Please note that fast release times will yield higher distortion levels. For extremely fast release times (50 ms or less) the compressor may start to distort, which may not be a favorable effect on low frequency sounds. Tip: Try setting the release time to sound natural with some movement to the sound. You may find it useful to use the visual feedback from the gain reduction meter while making this adjustment. |
Ratio
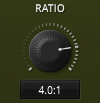 | Ratio determines the amount of gain reduction that gets applied as the input signal exceeds the threshold level. For example, applying a compression ratio of 2:1 means any input level that is 2 dB above the threshold will be attenuated, thus resulting in an output level 1 dB over the threshold. The ratio range is from 1.1:1 to 10.9:1. Tip: Sometimes it’s easier to setup the attack and release times using a high ratio and then reduce it afterward to the desired amount. |
Knee
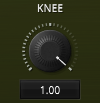 | Knee sets the rate where the compressor attains full compression as soon as the threshold has been exceeded. Molot is a soft-knee compressor, which means some amount of compression occurs even when the input signal is far from the threshold. A knee value of 0.5 will sound the most natural. Lower values will lead to lighter compression. Higher values will increase the “bend” of the transfer curve leading to a slight boost in gain just before the gain reduction starts. Tip: To achieve the “hammer-like” action that Molot is famous for, set the knee to maximum and adjust the threshold to enhance the transients. |
SC HP
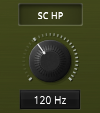 | SC HP is the sidechain highpass filter. Usually compressors overreact to low frequencies causing them to “duck” the highs and mids. The highpass filter makes it possible to filter out the low frequencies which prevents them from triggering the compression. The “SC HP” button will enable/disable the highpass filtering. The “SC HP” knob sets the cutoff frequency of the highpass filter. The filter also has a variable slope in which higher frequencies will have a smoother slope and smoother action. Note: If the “SC HP” button is disabled the highpass filter becomes inactive and a fixed -3 dB lowshelf filter is used instead. This works quite well on the mix bus. |
Dry Mix
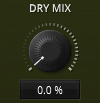 | Dry Mix sets the balance between the original signal (dry) and the compressed signal (wet). As an example, at 25% the output will be 25% dry and 75% wet. Setting the Dry Mix knob to 0% will only pass the processed signal (100% wet). Setting the Dry Mix knob to 100% will only pass the unprocessed input signal (100% dry). The Dry Mix control provides an additional way to reduce the amount of compression. The Dry Mix is usually used on aggressively compressed material in order to reduce distortion levels and return some of the transients back. Note: The dry signal is not affected by the Input gain or Makeup gain. If the processed signal has the same loudness as the unprocessed signal, then the Dry Mix control will provide a seamless blend of the two. Note: The gain reduction meters and total gain meters are affected by the “Dry Mix” control and will display a reduced “real” reduction. |
Advanced Controls
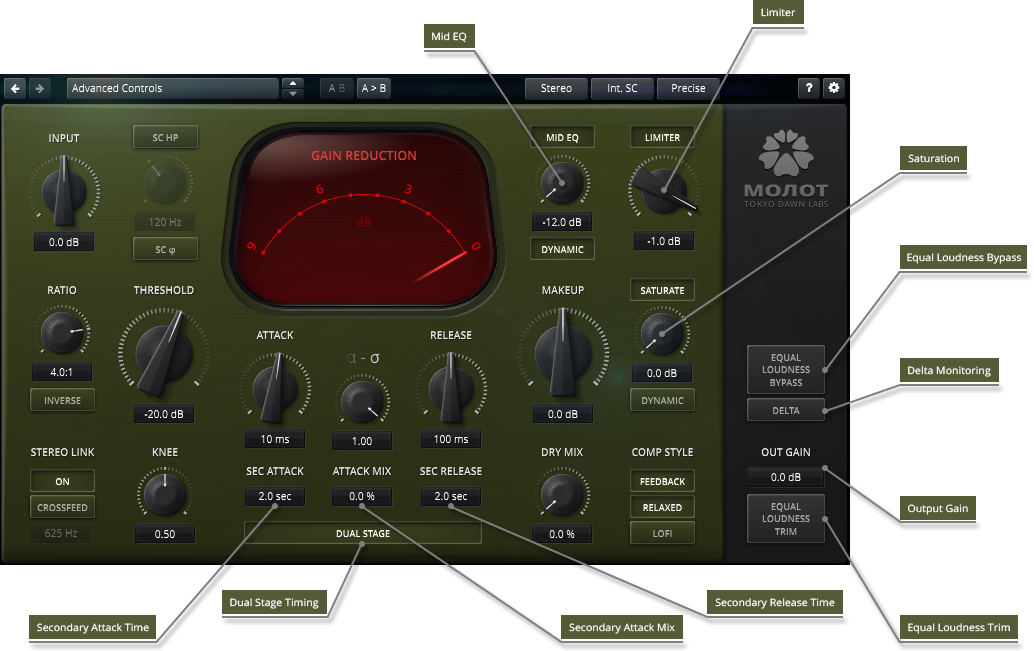
Signal Flow
Besides the compressor, Molot also offers:
- Equalizer
- Limiter module
- Saturation module
They are “hardwired” in series in the following manner:

Mid EQ
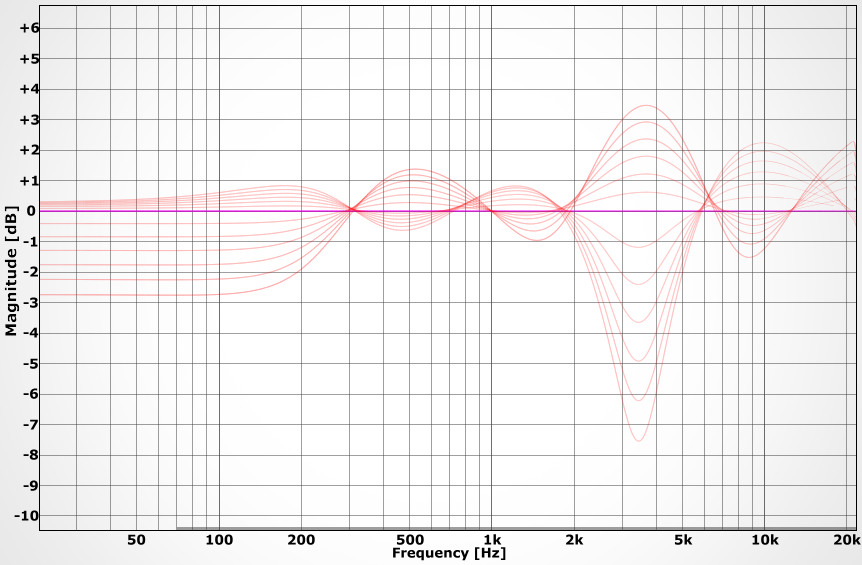
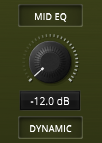 | Mid EQ is a single knob equalizer. The “MID EQ” button enables/disables the EQ. The “MID EQ” knob controls the simultaneous boosting and cutting of the fixed EQ curve frequencies located at 500 Hz, 1.5 kHz, 3.5 kHz and 10 kHz. This EQ curve allows for simple tonal changes. The “DYNAMIC” button enables/disables the dynamic EQ mode. In this mode, the EQ gain is connected to the compressor’s gain reduction and approaches 100% of its value at 6 dB or more of compression. The circular meter around the “Mid EQ” knob in dynamic mode displays the effective gain of the EQ. The EQ behavior in both the dynamic mode and static mode is affected by the “Dry Mix” control. |
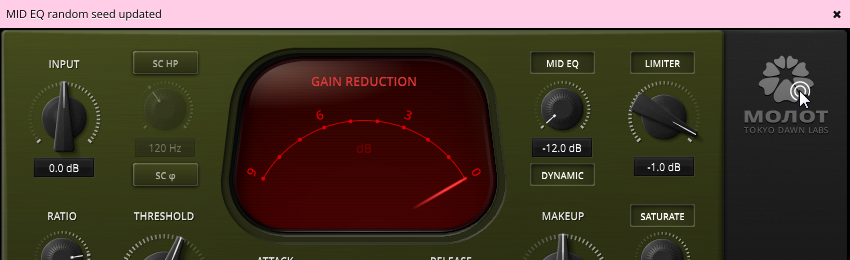
Tip: In stereo mode the EQ curve has slight differences between the left and right channels, similar to tolerances in analog stereo hardware. This difference is derived from a random seed value, which is automatically generated for each new plugin instance. Double-click on the “Molot” logo to get a new random seed value.
Mid EQ Curve Frequencies Located at 500 Hz, 1.5 Khz, 3.5 Khz and 10 Khz:
Limiter
 | Limiter controls the brick wall peak limiter. When longer attack times are used, transients may end up passing through the compressor too much. A brick wall limiter can bring such peaks under control. The “LIMITER” button enables/disables the limiter module. The “LIMITER” knob controls the limiter threshold. The limiter doesn’t use any lookahead behavior, which allows for it to operate at zero-latency. Technically, this limiter is a clipper with an auto-release ranging from 5 ms to 50 ms. The limiter sounds acceptable when suppressing signal peaks, but may sound dirty when overused. When the limiter initiates, the “LIM” lights up on the display. The Limiter behavior is not affected by the “Dry Mix” control. |
 | Tip: Use the visual feedback from the circular meter around the “LIMITER” knob to help when adjusting the threshold. |
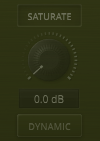
Saturate
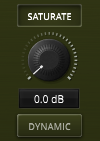 | Saturate controls the saturation module. The “SATURATE” button enables/disables the saturation module. The “SATURATE” knob drives the saturation circuit without changing the overall level. The saturation algorithm is based on real hardware device modeling and developed specifically for TDR Molot GE. The “DYNAMIC” button enables/disables dynamic saturation mode. This mode makes the saturation threshold depend on the compressor’s gain reduction. High amounts of gain reduction cause more saturation while low amounts of gain reduction produce much less saturation. This leads to a higher distortion level for transients. Saturation is not affected by the “Dry Mix” control. |
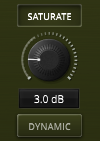 | Tip: The circular meter around the “SATURATE” knob shows a rough approximation of the THD (total harmonic distortion) level added by the saturation. The lowest circular meter position represents 1% of THD and the highest circular meter position represents 10% of THD. |
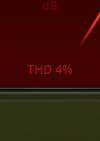 | For THD greater than 3% the value becomes visible on the Gain Reduction Display and Total Gain Display. This allows for visual control of the saturation amount added. Generally it’s not recommended to introduce more than 10% of THD. |
 | Important: The Saturate controls display as inactive when the Live or Eco processing quality modes are selected. |
Out Gain
| Out Gain sets the overall output signal level after processing. This gain can be used to compensate for all cumulative level changes introduced by the compressor, EQ, limiter, and saturation modules. |
Equal Loudness Bypass
 | Equal Loudness Bypass bypasses the plugin processing and automatically adjusts the loudness of the bypassed signal to match the output signal. This provides better comparisons between the bypassed signal and output signal without changing loudness. Note: Don’t let the flawed idea that “louder is better” fool you. |
Equal Loudness Trim
 | Equal Loudness Trim automatically adjusts the “Out Gain” value so that the loudness of the output signal matches the bypassed signal. |
Delta
| Delta outputs the difference between the input signal and the output signal. This allows you to hear only the processing changes of the signal in isolation. In “delta” mode only the compressor is active and the EQ, Limiter, Saturation, and Makeup are inactive. Tip: Use the “Delta” mode to help fine-tune any subtle/invisible compression. |
Dual Stage
| Dual Stage activates the “dual-stage” compression mode. A lot of classic compressors offer “program dependent” or “auto” release modes. How do they work? When a compressor initiates and gain reduction occurs, an additional detector begins to charge. This charging time is long enough that short compression peaks don’t charge the detector at all, but longer duration’s do. Upon compression release, this additional detector has its own release time and its output is mixed with the compressor’s control signal. This leads to a “dual-stage” release curve shape. If the release time of this “dual-stage” curve is measured, it can be seen that the release time is now dynamic and depends on the duration of the gain reduction event. While shorter peaks have shorter release times, longer steady compression has longer release times, making the compressor “program dependent”. In analog compressors the additional detector charge and release time values are hidden, therefore they can’t be controlled by the user. In Molot it’s possible by to change these values by the user. Tip: Use the dual-stage mode for bus compression. |
Dual-Stage Detector Action:
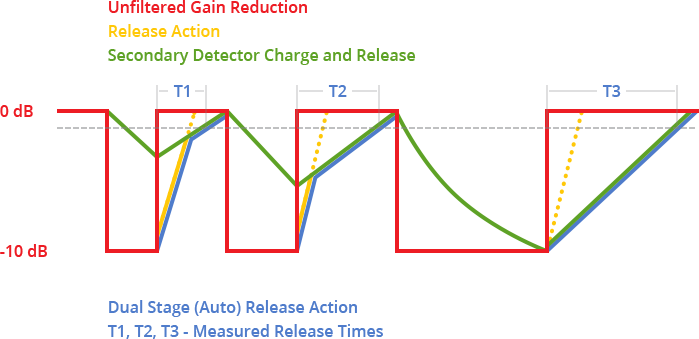
Sec. Attack
| Sec. Attack is a secondary attack time that controls the additional detector charge time. This parameter controls the dynamic release “charge” speed. The dynamic release time is changed from the primary release time (set by the Release parameter) to the secondary release time (see below). |
Sec. Release
| Sec. Release is a secondary release time that controls the additional detector release time. This is the maximum value for the dynamic release. |
 | Tip: When the “DUAL STAGE” button is enabled a circular meter will appear around the “RELEASE” knob. This meter displays an estimated dynamic release time. Use this meter to help adjust the “Sec. Attack” parameter (which affects how dynamic release time grows) and the “Sec. Release” parameter (which affects the dynamic release time maximum). |
Attack Mix
| Attack Mix makes the additional detector charging process affect (“leak to”) the compressor’s attack behavior. This leads to the “dual-stage” attack curve shape. |
Secondary Attack Mix Action:
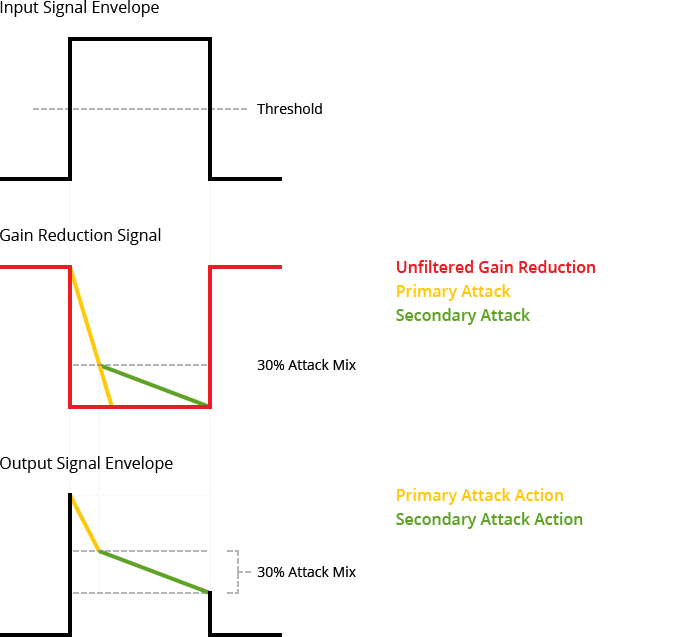
Tip: The Attack Mix feature works extremely well when the attack time is very short. This allows it to apply the fast primary attack on the initial portion of the transient and slower secondary attack on the remaining part.
Note: Since the Attack Mix affects the charging of the additional detector, further “Sec. Release” adjustments may be required.
 | Tip: When the “DUAL STAGE” button is enabled a circular meter will appear around the “ATTACK” knob. This meter displays an estimated time for the dual-stage attack. Use this meter to help set the Attack Mix. |
Expert Controls
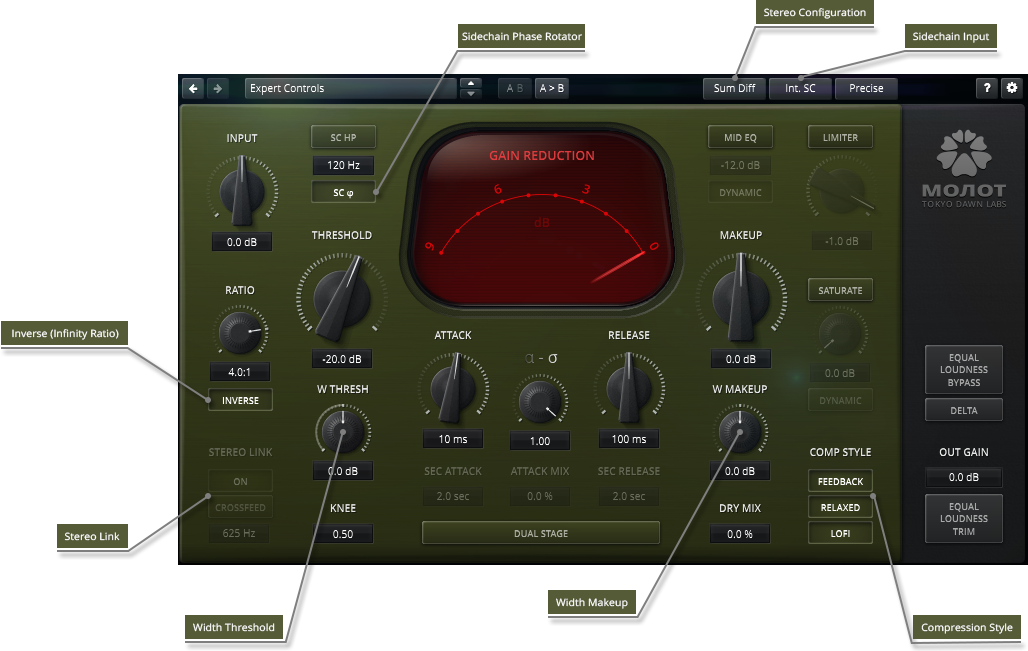
Sidechain Input
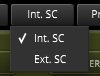 | Int. SC/Ext. SC switches between the internal sidechain input and the external sidechain input. This can be used to “duck” one track by another. You’ll also need to route the external sidechain signal to the plugin sidechain input when:
|
 | Tip: Upon successful routing, the circular meter around the “THRESHOLD” knob will display the external sidechain signal level. |
Important (Pro Tools only): The sidechain button displays as inactive when no external sidechain signal (key input) is selected.

The sidechain button becomes active once the key input has been selected.

Stereo Configuration
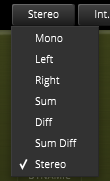 | The audio input can be processed in various channel modes:
|
| Important: The Stereo Configuration button displays as inactive when the plugin is inserted on a mono or multi-mono track. This feature is not supported in all hosts. |
W Threshold
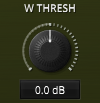 | W Threshold (“Sum Diff” channel mode only) sets the compressor’s threshold for “Diff” channel processing. The “W” in the parameter name stands for “width”, which is the difference between the “Diff” and “Sum” levels (i.e. the “relative difference” level). Using the “Width” level instead of the “Diff” level when setting the threshold allows you to disregard the input level, thus simplifying the procedure. |
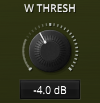 | Tip: Use the circular meter around the “W Threshold” knob, which shows the measured “width” level, to help with setting the parameter. |
The Gain Reduction display and Total Gain display show two separate gain reduction meters for the “Sum” and “Diff” channels.
W Makeup
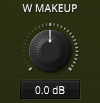 | W Makeup (“Sum Diff” channels configuration only) sets the compressor’s makeup for “Diff” channel. The “W” in the parameter name stands for “width”, thus changing this value affects stereo image width. Just like the normal “Makeup” parameter, use the “W Makeup” parameter to compensate for loss in loudness caused by the gain reduction. |
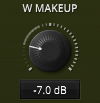 | Tip: The circular meter around the “W Makeup” knob, similar to the meter around the “Makeup” knob, shows the action for the “Diff” channel. |
Stereo Link
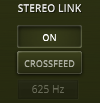 | Stereo Link (“Stereo” channels configuration only) controls the compressor’s stereo linking. For example, how the left channel gain reduction affects the right channel gain reduction and vice versa. The following are the stereo link modes:
|
Comp Style
 | Comp Style provides additional controls for changing the tonal character of the compressor. Feedback switches the compressor from feedforward to feedback mode. Feedback mode produces the sound of vintage compressors and sometimes described as “less controllable” and “more musical”. Technically, in feedback compressors the attack and release times depend on the compression amount. Enable this mode if you need more coloration. In TDR Molot GE the feedforward and feedback modes also have different knee shapes for the compression curve. This leads to additional tonal differences between these two modes. Note: The 1176, LA2A and SSL Bus Compressor are all feedback compressors. Relaxed toggles between “instant” mode and “relaxed” mode. If this switch is turned off, “instant” mode is enabled. “Instant” mode automatically sets shorter release times for sharper (high crest-factor) signal peaks. This leads to a more aggressive and “in your face” type of sound. If the switch is turned on, “relaxed” mode is enabled. “Relaxed” mode has a slighter increased release time during small amounts of gain reduction. This leads to a lazier and less transparent type of sound with a slight amount of “pumping” behavior during the release. Note: The original Molot plugin operated in “relaxed” mode. LoFi enables bit depth reduction on the compressor’s gain reduction and output signal. The bit depth of the gain reduction is reduced to 8 bit which produces a dirtier “lo-fi” type of sound. It also serves as a “hold” function for the gain reduction, as the gain is changed in small steps without any “ringing” or “movement” between them. The bit-depth of the output signal is reduced to 12 bit. This acts as an instant gate and removes the depth from the audio, which leads to a more aggressive “in your face” type of sound. Tip: Bit depth reduction on a track may sound undesirable when soloed, but in the context of a mix it can serve as an enhancer by bringing the processed channel forward. |
SC Rotate
| SC Rotate activates a phase rotator for the sidechain signal. The phase rotation adds a frequency dependent delay to the lower frequencies, which become delayed relative to the higher frequencies. This only affects the compression and not the sound passing through the compressor. The delayed low frequencies will also have increased attack and release times. The sidechain frequency knob affects the phase rotation point and the amount of delay introduced. Use this mode to add further coloration to the compression. Note: Since the phase rotation alters the crest factor (the ratio of peak value to average value) of the signal, enabling “SC Rotate” may change the amount of compression. |
Inverse
| Inverse emulates a type of “invalid circuit connection” glitch. In feedforward mode the feedback transfer curve is used. This leads to a significantly increased compression ratio. For ratio settings greater than 2:1 the compression becomes negative (beyond infinity) and therefore quieter once the signal exceeds the threshold. This results in “explosion” like sounds if threshold is set on the transients. In feedback mode the feedforward transfer curve is used. This leads to a very gentle compression with smaller ratios closer to 1:1. Tip: Use this mode as special effect. |
Toolbar
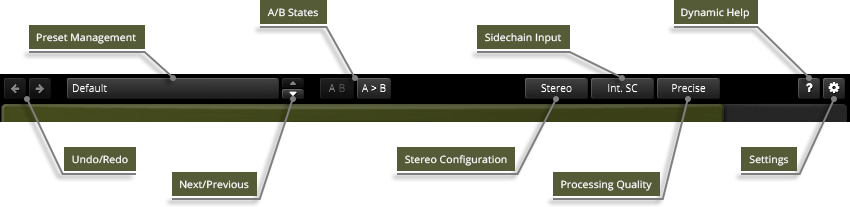
Undo/Redo
| Use the undo/redo buttons to recall previous/next parameter changes. The exact event is shown in a tool tip. Please note that certain parameter changes are not tracked by this function (e.g. “Bypass”). |
Preset Management

The preset drop-down list offers quick access to factory settings and user presets.
| The next/previous buttons allow you to cycle through the presets. |
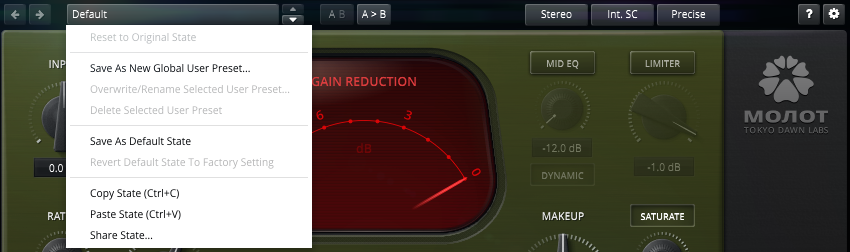
Advanced preset management options are available from the context menu (Right-click).
Reset to Original state resets the currently active preset to its original state.
Save As New Global User Preset opens a dialog used to create User Presets. Note that these presets persist across sessions and DAWs (presets are saved on your machine). The total amount of user presets is limited to 20.
Overwrite/Rename Selected User-Preset allows to overwrite or rename presets.
Delete Selected User Preset allows to delete the current user preset.
Save As Default State replaces the plugins’ default preset with the current parameter state.
Revert Default State To Factory Setting deletes an overwritten default state.
Copy State (Ctrl+C) copies the current control states to the clipboard. This allows for applying control states (i.e. “presets”) across plugin instances and plugin hosts by using the Paste State command.
Paste State (Ctrl+V) pastes the control states from the clipboard.
Share State opens a dialog with additional preset sharing options via e-mail or internet forums.
A/B Control
| A/B allows to compare two alternative control settings. |
| A>B and B<A copies one state to the other. |
Stereo Configuration
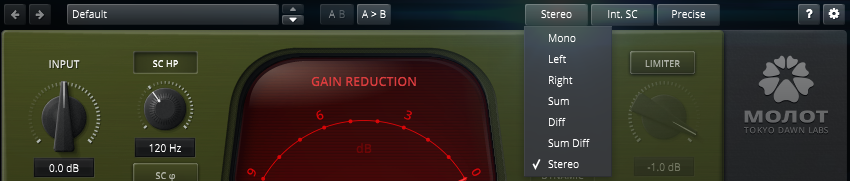
The audio input can be processed in various channel modes:
- Stereo processes the left and right channels. The Stereo Link parameter is used to link the gain reduction in the left and right channels.
- Mono processes the left channel only. The right output channel will be the same as the left output channel.
- Left processes the left channel only and leaves the right channel unprocessed.
- Right processes the right channel only and leaves the left channel unprocessed.
- Sum processes the sum of the left and right channels (often referred to as Mid or M channel) and leaves out the difference between the left and right channels (often referred to as Side or S channel) unprocessed.
- Diff processes the difference between the left and right channels and leaves the sum of the channels unprocessed.
- Sum Diff processes both the sum and difference channels (often referred to as M/S processing). In this mode additional “W Threshold” and “W Makeup” parameters get displayed.
| Important: The Stereo Configuration button displays as inactive when the plugin is inserted on a mono or multi-mono track. This feature is not supported in all hosts. |
Sidechain Input

Int. SC/Ext. SC switches between the internal sidechain input and the external sidechain input. This can be used to “duck” one track by another. You’ll also need to route the external sidechain signal to the plugin sidechain input when:
- Routing external sidechain signals to plugin inputs 3/4 in stereo or to input 2 in mono (VST 2).
- Enabling the external sidechain input on the native DAW toolbar of the plugin window, which allows for using the sidechain routing capabilities provided by the DAW (VST3/AU/AAX).
| Tip: Upon successful routing, the circular meter around the “THRESHOLD” knob will display the external sidechain signal level. |
Important (Pro Tools only): The sidechain button displays as inactive when no external sidechain signal (key input) is selected.
The sidechain button becomes active once the key input has been selected.
Processing Quality

Molot GE offers four different processing quality modes:
- Live – A zero latency mode used for live tracking situations. The Saturate controls display as inactive when using this mode.
- Eco – An economic CPU efficient mode used when CPU processing is limited. The Saturate controls display as inactive when using this mode.
- Precise – The default high fidelity processing mode.
- Insane – A very high quality processing mode which increases CPU load. Use it when CPU processing is abundant.
Help
| The dynamic help mode offers detailed information about the various elements of the user interface. Click “?” to activate the online help and move the mouse cursor over the control of interest. A small info bubble will appear displaying the function and details of the item. |
Settings
| The settings button opens a dialog which gives control over additional plugin options. |
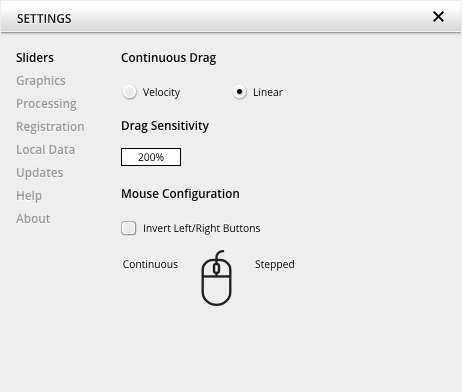
Slider allows for changing the behavior of knobs and control points in response to the mouse. Under Continuous Drag, knob and controller movement relies on mouse speed when Velocity is enabled. When Linear is enabled, knob and controller movement is proportional to mouse movement. Drag Sensitivity sets the linear sensitivity of the knob and controller movement further.
Plug-in controls, knobs, and control points can be adjusted using Left-click & drag (Continuous) and Right-click & drag (Stepped) by default. Mouse Configuration swaps the Continuous and Stepped behaviors between the left and right mouse buttons when selecting Invert Left/Right Buttons. Note that the default stepped values can be customized via the product configuration file. See “Local data” below for instructions on how to access this file.
Graphics allows for changing the interface size to a fixed percentage value between 100%, 125% and 150%.
Processing shows the plug-in latency and sample rate details. Highest quality rendering enables the option to always render at the highest Processing Quality, no matter what type is enabled in the Toolbar. See the “Processing Quality” subchapter for more details on these modes.
Registration offers access to offline and online product registration options. See the “Product Registration” chapter for more information.
Local Data allows for exporting and importing user preferences, presets, and keys, to and from other systems. Local data can also be deleted for all Tokyo Dawn Labs plug-ins using the Trash Can button.
In addition, the Folder button opens the Tokyo Dawn Labs local data folder containing all configuration files and keys. Note that these operations affect all TDR plug-ins, and not just Molot GE.
Updates allows to Check for updates and to Download latest version. Automatic Lookups can be enabled to Check for updates (once per day).
Help contains Documentation and Support links.
About shows the version number, build date, format, credits, and other information.
Context Menus
Standard Context Menu

Additional options can be accessed using the standard context menu. This can be opened by Right-clicking on a blank area anywhere in the UI. A click outside of the menu closes it.
User Interface offers language options.
- Language
- English displays the English language in the UI.
- Russian displays the Russian language in the UI.
User Interface Scale sets the on-screen interface size to a fixed percentage value of 100%, 125%, or 150%.
Instance allows for renaming the specific plug-in instance.
Copy State (Ctrl+C) copies the current control states to the clipboard. This allows for applying control states (i.e. “presets”) across plugin instances and plugin hosts by using the Paste State command.
Paste State (Ctrl+V) pastes the control states from the clipboard.
Share State opens a dialog with additional preset sharing options via e-mail or internet forums.
Gain Reduction Display Context Menu
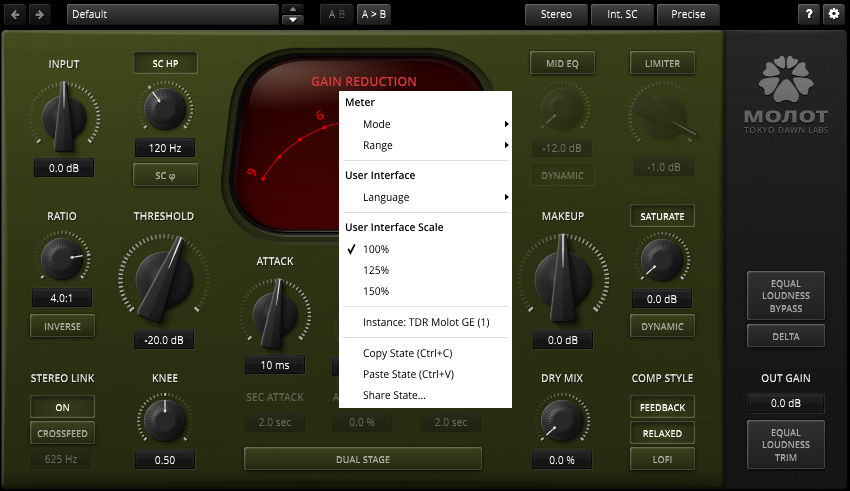
The gain reduction display context menu provides additional options. This can be opened by Right-clicking anywhere on the gain reduction display. A click outside of the menu closes it.
Meter provides several options for configuring.
- Mode
- Relative displays the gain reduction caused by the compression.
- Absolute shows the gain change caused by the input gain, the compressor’s gain reduction, and the makeup gain.
- Range sets the meter range to 2 dB, 3 dB, 4 dB, 6 dB, 9 dB, 12 dB, 18 dB, 24 dB, or 32 dB.
User Interface offers language options.
- Language
- English displays the English language in the UI.
- Russian displays the Russian language in the UI.
User Interface Scale sets the on-screen interface size to a fixed percentage value of 100%, 125%, or 150%.
Instance allows for renaming the specific plug-in instance.
Copy State (Ctrl+C) copies the current control states to the clipboard. This allows for applying control states (i.e. “presets”) across plugin instances and plugin hosts by using the Paste State command.
Paste State (Ctrl+V) pastes the control states from the clipboard.
Share State opens a dialog with additional preset sharing options via e-mail or internet forums.